Metamath-lamp Guide: User Guide (Tutorial) and Reference Manual
Metamath-lamp (Lite Assistant for Metamath Proofs) is a proof assistant for creating formal mathematical proofs in the Metamath system. Unlike most other Metamath proof systems, such as mmj2 or metamath-exe (the first Metamath proof assistant), users can use this proof assistant without installing anything. Instead, you can start using metamath-lamp by using your web browser to view the Metamath-lamp application page.
This is a guide for metamath-lamp, including both a user guide (tutorial) and a reference guide. It includes:
- Quick start briefly introduces how to start and use metamath-lamp.
- Sample Screenshot
- User guide (tutorial)
shows how to use the metamath-lamp tool, primarily via examples, e.g.,
2 + 2 = 4 (
2p2e4), the reciprocal of the cotangent is tangent (reccot), and the principle of the syllogism (syl). - Reference manual explains each part of the user interface, e.g., the Editor tab.
- Future directions discusses likely future directions.
- Help, feedback, and contributions
- Licensing
- Detailed table of contents
- Authors and Reviewers
Metamath-lamp is a new proof assistant for creating Metamath proofs. As a result, it currently lacks some planned functionality such as undo/redo, full syntactic unification, and some of the automation rules included in other tools like mmj2. There are also no doubt some inconsistencies in its UI due to its newness. That said, metamath-lamp already provides useful functionality, including some automation support. It can also run directly in your web browser with no additional installation, which some may find compelling. We hope you’ll find it useful.
Note that metamath-lamp changes over time, so some of this guide may not exactly match what you see. If you see a difference, please let us know so we can fix this guide. We try to make this guide match the tool it’s describing. This guide was written for release version 10.
The latest version of this Metamath-lamp guide (the guide that you are currently reading) is always available at <https://lamp-guide.metamath.org/>.
Quick start
You don’t need to install anything to run metamath-lamp. To start metamath-lamp, use your web browser to view the Metamath-lamp application page.
To use metamath-lamp, do the following:
- Load the proof context (the databases you’ll use and their scope).
- Set the fundamental proof information where desired (its description, variables, and disjoints).
- Add the goal (
qed) and any hypotheses to the list of steps. Set their labels to what you want them to be in the final database. - Now create the proof. To do this, you add other steps and repeatedly unify them until the goal is completely proven. You can create the proof backwards from the goal, forwards towards the goal, or in whatever other order makes sense to you.
- Copy the compressed proof of the goal into the clipboard. You can do this by selecting the green checkmark next to the goal to show the compressed proof, then press copy. You’d typically copy that compressed proof into a Metamath database (text file).
Throughout metamath-lamp there are various tooltips. So if you hover over an interactive item, in most cases the tool will provide a brief explanation of what that item does. You don’t need to memorize this guide!
This software works on many different systems which have different conventions. On some Macintosh keyboards the “Enter” key is instead labelled “Return” and the “Alt” key is instead labelled “Opt” or “Option”. On a touchscreen (like a smartphone), a quick touch and release on a UI control is the same as a left click. Metamath-lamp has some actions that are quickly accessed using Alt+left click (hold down the Alt aka Opt key, and while holding it use left click).
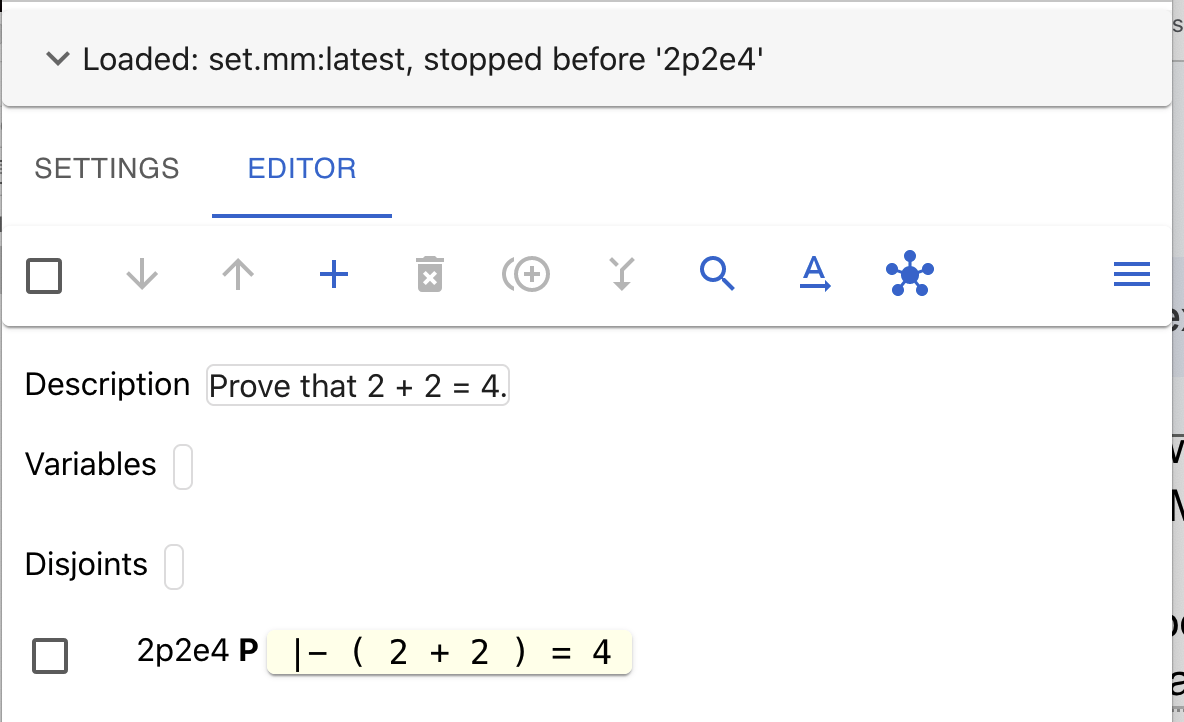
Sample Screenshot
Here’s a sample screenshot to give you an idea of what using metamath-lamp looks like (proving that 2 + 2 = 4):
You can start using metamath-lamp immediately by visiting the Metamath-lamp application page.
You can even start using metamath-lamp preloaded with a proof state, for example, that 2 + 2 = 4 or the tangent is equal to the reciprocal of the cotangent.
User guide (tutorial)
This is the user guide (tutorial) portion of this overall guide. In this section we will explain how to use metamath-lamp to create some proofs by creating some example proofs. We recommend starting the tool and apply these examples.
We will start with a simple proof that 2 + 2 = 4.
Proof: 2 + 2 = 4
Let’s show how to use metamath-lamp to create a simple proof, namely,
that 2 + 2 = 4. This has already been
proved in the set.mm database as theorem 2p2e4.
Selecting the proof context for 2p2e4
We first need to decide on the proof context, that is, the database(s)
of axioms and proven theorems we’ll use. In this case we’ll use the most
common metamath database, set.mm. This database uses the very common starting
points of classical first-order logic and ZFC set theory.
We’ll also tell it to stop using the database just before its
proof of 2 + 2 = 4, which in this database is named 2p2e4.
If we included the existing proof, the prover
would simply reuse that existing proof.
Select Source type “Web”, Alias “set.mm:latest”; after confirmation this loads the given database. Now under scope select “Stop before” and enter the label
2p2e4. Finally, apply changes to the context.
Setting the goal for 2p2e4
For this example we’ll leave the proof description, variables, and disjoints blank. We do need to tell metamath-lamp our goal.
In the Editor select the icon
(add new statement‡). Don’t try to select the similar icon
as that would try to create a duplicate. There are no steps to duplicate so the tool will not let you do that anyway. Enter
|- ( 2 + 2 ) = 4and press Enter (Return) to save the result.
Be sure to surround each symbol by at least one space (the first and last symbols can start and end the statement).
The set.mm database has strict rules about parentheses. For example, set.mm requires that infix functions like “+” be surrounded by parentheses. This is very easy to understand once you have some experience with Metamath proofs in set.mm, and it eliminates ambiguity. We will explain the rules in more detail later. For now, if you encounter an error while repeating the first example, please re-check if you typed in all the statements exactly as per the example.
For our purposes, we’re going to rename the label of our goal.
Renaming the label of the goal (or any other step) is
not required by metamath-lamp. You could instead just continue using the
label metamath-lamp suggested. But renaming some of the steps
(especially the goal) makes them easier to distinguish for you
and eventually this name will appear in the final generated proof.
If you don’t know what else to name the goal, we suggest using the name
qed to reduce confusion.
In general, if you plan to eventually add this proof to the
set.mm or iset.mm
databases, then you need to follow the
set.mm database conventions,
including the
set.mm label naming conventions.
In this case, the conventional name for this goal would be
2p2e4.
So let’s rename this goal step to 2p2e4:
Left click the label of the first step (you have to click directly on the number “1” to the left of the first step). Change the name of the step from “1” to
2p2e4and press Enter (Return).
Interlude: Brief review of metamath-lamp user interface
Let’s look at the display we have so far (your screen may look somewhat different):
The top line summarizes the context - we loaded the set.mm database
(classical logic and ZFC set theory) and stopped reading the database before
2p2e4.
The next line is the tab bar, letting you select between Settings and Editor. If you want to change the configuration of the tool, use Settings. Normally you’‘l be in the Editor tab (which lets you edit proofs), so we’ll focus on that.
Below the word “Editor” is the editor command icon bar.
The editor command icon bar shows many different icons;
each icon represents a command you can use to modify a proof.
We’ve already used one icon, the icon
![]() that adds a new statement‡ and looks like a “+”.
The reference manual section
Editor command icon bar discusses each
icon and the command it performs in more detail.
You can hover over an icon to see what the command is.
that adds a new statement‡ and looks like a “+”.
The reference manual section
Editor command icon bar discusses each
icon and the command it performs in more detail.
You can hover over an icon to see what the command is.
Here are the icons in the edit icon bar and the commands they perform:
| Icon | Meaning | Visual Description | Additional information |
|---|---|---|---|
| Select all | Checkbox | Select or deselect all current statements‡ | |
| Down | Down arrow | Move the selected statements‡ down the list | |
| Up | Up arrow | Move the selected statements‡ up the list | |
| Add new statement‡ | Plus sign | Type in the new statement | |
| Delete selected statements‡ | Trash can | ||
| Duplicate selected statement‡ | Circles behind “+” | Makes a copy of the selected statement‡ | |
| Merge similar statements‡ | Merge | Select one statement‡ | |
| Search | Magnifying glass | Add new statements‡ by searching for a pattern; see search patterns | |
| Substitution‡ | A with arrow | Apply a substitution‡ (aka replacement) to all statements; se replacement | |
| Unify | Hub | Unify all statements‡ or unify selected provable bottom-up. If no statements‡ are selected, attempt to unify everything. If one statement‡ is selected, open proving bottom-up dialogue | |
| Menu | 3 short horizontal lines aka hamburger | Menu of other actions |
Under the editor command icon bar is basic information about the proof
(such as its description) and steps for the proof.
We see one step already, with the label 2p2e4.
Every step has a box on its far left, which lets you select
(or deselect) the step to choose what to act on.
Terminology: A proof is a series of one or more steps.
A valid proof must have at least one step (the goal).
Each step has a collection of information, such as its label
(to identify it),
step type (is this a hypothesis or something provable?),
justification (if any), and statement
(typically beginning with |- ...).
In a completed proof, each step must be a
hypothesis or justified to be true.
A step label is sometimes informally called a step id or step name.
The tool UI sometimes says “statement” when it means “step”.
To make things clearer, we’ll add a “‡” symbol after the
word “statement” or “statements” when we really mean “step” or “steps”,
so that the words we show are consistent with the UI.
The term “substitution” also has multiple meanings; we will use
“substitution‡” when we mean the replacement menu operation
(instead of the fundamental Metamath operation called substitution).
Now that we’ve had a brief introduction to the metamath-lamp user interface, let’s decide how to use it to create our proof.
Deciding on a proof strategy for 2p2e4
Now we need to figure out how to prove this goal.
Metamath-lamp can do some things automatically. However, we will intentionally avoid some of those automations to see how to prove something in cases where the automations can’t do enough.
There are many different ways to create a proof, including backwards from the goal, forwards toward the goal, or any other order. Metamath-lamp supports them all. Also, note that there are often many different proofs for the same true final statement. Here we’re going to show one way to do it, as an example.
In many cases we can prove a statement by identifying definitions of what we want to prove, finding their expansions, and repeatedly expanding and simplifying the results to show that what we want to prove is correct. Let’s take that approach.
Expanding the meaning of 4
In this case, we want to prove that something is 4, so the definition of 4 would probably be useful. We’ll search for the definition of 4 so we can add it to our list of steps.
Select the icon
(search); under pattern enter
4 =and click on Search. Select the step labelleddf-4and press “Choose Selected”. You will now have a new step with a label of 1:|- 4 = ( 3 + 1 )
Notice that in each step,
to the right of the label and the left of the statement
(starting with |-), there is a bold letter P.
This bold letter P is the step type; the P
means that this step is intended to be provable.
In some cases you’ll want a step to be a
hypothesis instead being provable.
You can select the P with Alt+left click to change it to
to an H (hypothesis) or back to P (provable).
We aren’t going to use any hypotheses
in this proof, so we won’t do that for now.
This definition of 4 depends on the definition of 3, so let’s add
the definition of 3 as well.
Note that df-4 is the definition of 4; this suggests a naming convention,
so we can probably just use the naming convention to find it.
Select the icon
df-3and click on Search. Select the step labelleddf-3and press “Choose Selected”. You will now have a new step with a label of 2:|- 3 = ( 2 + 1 )
We can connect the definition of 4 using the definition 3 by simply adding 1 to both sides of the definition of 3. We can simply add a step that claims this statement and see if metamath-lamp can find a justification that proves this is correct (in this case it can). In fact, if each step makes very small changes, metamath-lamp can sometimes prove many statements automatically.
We don’t want to add this step as the last step, so we’ll select the last step before adding it (so we’ll insert that step before it).
Select the checkbox to the left of the
2p2e4goal statement. Then press icon2p2e4. Enter, for this new step, the statement|- ( 3 + 1 ) = ( ( 2 + 1 ) + 1 )and press Enter (Return). Unselect the checkbox to the left of the2p2e4label. Now, while no steps are selected, press press the icon(unify). Since there was no specific step selected, it will try to justify all steps. Metamath-lamp will succeed in finding a justification for our new step, so it will show a green checkmark next to our new step.
We could later on connect this proof of ( 3 + 1 ) to the number 4.
However, in a more complex proof we might forget that we were trying
to prove an expansion of a value in the goal (4 in this case).
So let’s “clean up” now by directly proving that this term is an
expansion of a symbol in the goal. Instead of typing it all in, we’ll
use the “duplicate” command to get us started:
Select the checkbox to the left of the new step
|- ( 3 + 1 ) = ( ( 2 + 1 ) + 1 )and press the icon( 3 + 1 )to 4; once you have|- 4 = ( ( 2 + 1 ) + 1 )press Enter (Return). Press the icon2p2e4step.
Expanding the meaning of ( 2 + 2 )
Our goal involves showing that the symbol 2 and 4 have some kind
of relationship. A common technique to create proofs is to expand
the definitions of terms and then show that their expansions are equivalent.
We’ve already expanded 4, let’s now expand 2.
Select the icon
df-2and click on Search. Select the step labelleddf-2and press “Choose Selected”. You will now have a new step with this statement:|- 2 = ( 1 + 1 )
This definition of 2 is similar to the value we expanded for 4.
Both have a 1 followed by another 1 at their end.
We can take the definition of 2 and add 2 to both sides, at the
beginning of each side, to produce a very similar expression.
Let’s try that.
Select the checkbox to the left of the new statement
|- 2 = ( 1 + 1 )and then press the icon|- ( 2 + 2 ) = ( 2 + ( 1 + 1 ) )and press Enter (Return).
While editing this statement you may find some parenthesis appear automatically in unwanted places. This is actually intended to be a handy feature when writing new statements. But when editing existing ones it might be redundant. Please remove unwanted parentheses and make sure the statement looks exactly as in the example.
Now press the icon
Showing these expansions are equal
At this point we’ve shown that 4 and ( 2 + 2 ) are separately
equal to very similar expressions. If we could prove that those expressions
are equal to each other, we could trivially prove our goal.
Let’s try to do that.
Select the checkbox to the left of the
2p2e4goal step. Select the icon|- ( ( 2 + 1 ) + 1 ) = ( 2 + ( 1 + 1 ) )and press Enter (Return). Unselect the2p2e4step. As an experiment, select the icon
It’s actually true that
( ( 2 + 1 ) + 1 ) is equal to ( 2 + ( 1 + 1 ) ).
That’s because addition is associative
(you can do the first or second addition first and the result is the same).
The Metamath database in this context already has a proof that
addition is associative, too.
However, when you press
the icon ![]() (unify)
without selecting any steps,
metamath-lamp will not automatically prove this new step,
even though the Metamath database in this context
does have a proof of this statement.
The reason is that the rule in this Metamath
database requires some preconditions that are not currently
included in our proof.
(unify)
without selecting any steps,
metamath-lamp will not automatically prove this new step,
even though the Metamath database in this context
does have a proof of this statement.
The reason is that the rule in this Metamath
database requires some preconditions that are not currently
included in our proof.
So we’ll instead use a bottom-up search, which will try to find and
prove any other steps necessary to apply a relevant existing proof.
A bottom-up search can add new steps.
You enable a bottom-up search by selecting the step to be proved
and then pressing
the icon ![]() (unify).
(unify).
Select the checkbox next to our latest statement
|- ( ( 2 + 1 ) + 1 ) = ( 2 + ( 1 + 1 ) )and press the iconaddassi. The theoremaddassiis a pre-existing theorem showing that addition is associative. This requires multiple lines, because using this associativity theorem requires showing that1and2are complex numbers. Use the checkbox to its left to select that one, then press the “Apply Selected” button.
Suddenly a lot has happened.
We now have new steps that have been automatically added to our proof,
namely that 1 e. CC (1 is a complex number) and 2 e. CC
(2 is a complex number).
Now, without any steps selected, press the icon
We now have a green checkmark next to all our steps, showing that all steps are have been proven.
Most importantly, the final step 2p2e4 has a green checkmark, which
means we have proven our goal.
Metamath-lamp automatically unified all the steps,
and was able to complete the rest of the proof given what we had provided.
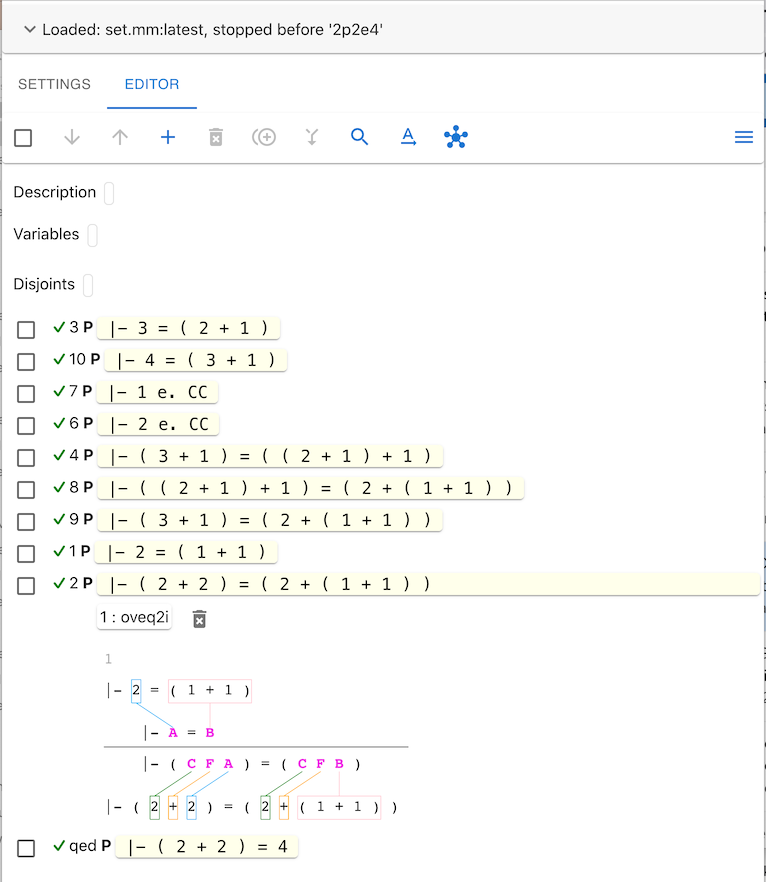
If you are new to Metamath and not familiar with formal systems, you may probably not understand how the program knows when to mark a step with a green checkmark meaning it is proved. The short answer is that the green checkmark means that metamath-lamp is able to find, for that step, a specific theorem or axiom that justifies the claim (as well as recursively all of its justifications). In a moment we will be looking at the proof steps (in more detail) to gain a better understanding. Before we do, let’s briefly talk about how to generate and import information.
Getting the completed proof
We can now show the compressed proof. This is the final proof we can add to a Metamath database.
Select the green checkmark (not “P”) on the
2p2e4goal step.You can select “Copy” to copy the compressed proof into the clipboard. Press “Close”
Exporting and importing your current state
You can only generate a proof once you have a proof.
Metamath-lamp can export the current state of your efforts, whatever they are, and anyone can reload them later. This lets you share details of a proof, even one that isn’t complete.
Left-click on the icon
(menu) on the top right of the display.
This will show several ways to export and import your current state:
- “Export to URL”: Provides a URL. You or anyone else can use this URL to re-open the proof assistant at this current state.
- “Export to JSON”: Provides the current proof assistant state as text; you can save this where you wish.
- “Import from JSON”: Allows you to load a state previously exported with “Export to JSON”.
Looking at proof steps
In Metamath, every step of a valid completed proof must be an application of an axiom, proven theorem, or previously-proven step. Metamath-lamp shows when it can verify this for a step (after unification) by displaying a green checkmark.
Let’s look at how metamath-lamp can justify some steps.
We’ll start with the claim that
|- ( 2 + 2 ) = ( 2 + ( 1 + 1 ) ):
Left-click on the P next to
|- ( 2 + 2 ) = ( 2 + ( 1 + 1 ) )to toggle the display its justification.
You will show a list of referenced labels that are being used,
colon, and oveq2i. This means that this particular
step is justified (proven) by using the already
accepted theorem oveq2i when applied to those labelled steps.
Advanced users can edit this to force metamath-lamp to
try to use a different justification.
You can also press the
icon ![]() (delete)
next to the justification
to delete it (e.g., because it uses a step no longer in
your proof, or because you want to prove it some other way).
(delete)
next to the justification
to delete it (e.g., because it uses a step no longer in
your proof, or because you want to prove it some other way).
But what does this justification mean?
Metamath-lamp can provide a visualization to show you what it means. So let’s enable it.
Left-click on the icon
You should see a visualization like this:
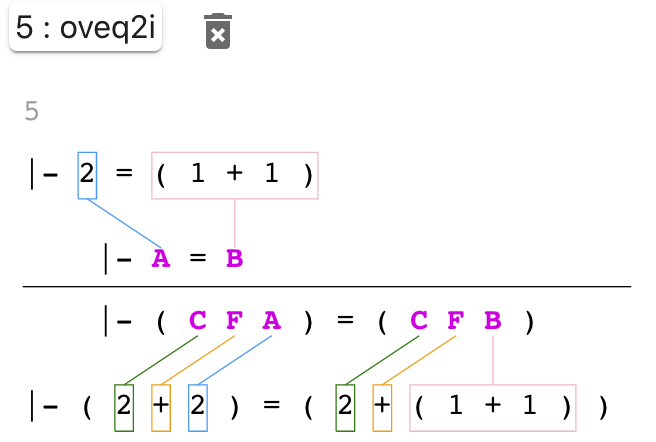
The top new line is set of labels being used as inputs into the justification. In this case there’s only one label; the label you see may be different than what’s shown here. Under that is a copy of that statement:
|- 2 = ( 1 + 1 )
Notice that variable parts of this statement are boxed
and directed lines connect them to another statement below.
The statement below is the set of required patterns
required by oveq2i, in this case |- A = B.
The lines show that in this use of oveq2i, A will be
2, and B will be ( 1 + 1 ).
The result of oveq2i are ( C F A ) = ( C F B ).
Any variable in its output must have the same values as
this application of its inputs; C and F have no
inputs, so they can be anything syntactically valid.
This means we can use oveq2i to justify the final claim,
|- ( 2 + 2 ) = ( 2 + ( 1 + 1 ) ).
We can also hide justifications (including the visualization) any time.
Left-click on the P next to
|- ( 2 + 2 ) = ( 2 + ( 1 + 1 ) )to toggle the display of its justification; since the justification is currently displayed, this will hide it.
Let’s do the same thing with the statement that
uses associativity,
|- ( ( 2 + 1 ) + 1 ) = ( 2 + ( 1 + 1 ) ),
Left-click on the P next to
|- ( 2 + 2 ) = ( 2 + ( 1 + 1 ) )to toggle the display of its justification, revealing it.
You can now see that the justification of this step
is addassi (addition is associative).
This justification has multiple requirements, which
as you can see are met.
Let’s end its display.
Left-click on the P next to
|- ( 2 + 2 ) = ( 2 + ( 1 + 1 ) )to toggle the display of its justification, hiding it again.
Reordering steps
You can reorder steps. Sometimes you need to reorder steps, because steps can only be justified by the context (axioms and proven theorems) and previous steps. You can’t refer to a later step, since that might allow circular reasoning.
To reorder some steps,
just select one or more
using the checkboxes on the left.
You may then use the
icon ![]() (up)
to move them up, or the
icon
(up)
to move them up, or the
icon ![]() (down)
to move them down.
(down)
to move them down.
Left-click on checkbox next to
|- ( 3 + 1 ) = ( ( 2 + 1 ) + 1 )and press the icon(up) - the step will move up.
Metamath-lamp will display error messages if steps are moved to make them depend on steps that have not been proved yet.
Proof: The reciprocal of the cotangent is tangent (reccot)
Let’s use metamath-lamp to create another proof, namely,
that the reciprocal of the cotangent is tangent.
This has already been
proved in the set.mm database as theorem reccot.
This proof will show some capabilities we didn’t see in the previous example. This includes work variables (and how to substitute them) and metamath-lamp’s syntax-aware mechanisms for copying and pasting portions of text (aka “fragment selectors”).
This exercise is based on the video showing how to prove the
same theorem using the mmj2 tool
(“Introduction to Metamath and mmj2” by David A. Wheeler)
and an earlier video of
reccot being proved using metamath-lamp (no sound).
Selecting the proof context for reccot
We first need to decide on the proof context, that is, the database(s)
of axioms and proven theorems we’ll use. In this case we’ll again use the most
common metamath database, set.mm. We will again be proving something
already in the database, so we need to make sure our context does not include
its proof (of reccot) or metamath-lamp will just reuse it.
If you’ve already been using metamath-lamp to prove something else, that means we need to erase the proof steps we have and change the context. Here’s how to do that:
Select the checkbox on the editor bar above the field name “Description” to select all steps. Select the trash can with an X (“delete selected statements‡”) to delete them all. At the top of the browser window, select the drop-down arrow with the “Loaded:…” text that hints at the context. Make sure we are loading from the web the file “set.mm:latest”, and change the scope to “Stop before” the label
reccotby typing it in and selecting it. Then press “Apply changes” to apply this change.
If, on the other hand, you’re starting from scratch, just set up the context as usual. Here’s how to do that instead:
Select Source type “Web”, Alias “set.mm:latest”; after confirmation this loads the given database. Now under scope select “Stop before” and enter the label
reccot. Finally, apply changes to the context.
Setting the goal for reccot
For this example we’ll leave the proof description, variables, and disjoints blank. We do need to tell metamath-lamp our goal.
In the Editor select icon
|- ( ( A e. CC /\ ( sin ` A ) =/= 0 /\ ( cos ` A ) =/= 0 ) ->
    ( tan ` A ) = ( 1 / ( cot ` A ) ) )
and press Enter (Return) to save the result.
This is a more complicated goal. It says that if A is a member of the set of complex numbers, and the sine of A is not equal to zero, and the cosine of A is not equal to zero, then the tangent of A is equal to 1 divided by the cotangent of A.
Be sure to surround each symbol by at least one space (the first and last symbols can start and end the statement), and be careful about where the parenthesis go.
Now modify the label of this goal to reccot.
Select the step label (1) using the left mouse button. Change the step label to
reccotand press Enter (Return).
Let’s take a brief look at this goal. It illustrates several symbols in the set.mm database:
- An uppercase letter like
Arepresents a class (any set is also a class). By convention we start withAunless there’s a reason to do otherwise. CCrepresents the set of all complex numbers.e.represents “is a member of”; soA e. Bis how we write “A ∈ B”. The expression A e. CC means “A is a complex number”.- \/ represent “and”. It’s not used here, but /\ represents “or”.
=/=represents “not equal to”.->represents “implies”. The left-hand-side of an implication is called the antecedent; the right-hand-side of an implication is called the consequent./represents complex number division.- The form ( FUNCTION ` ARGUMENT )
applies function FUNCTION to ARGUMENT, that is, it determines the
value of the function for that argument.
Therefore ( tan ` A ) is the tangent of
A. This left apostrophe notation originated from Peano and was adopted in Principia Mathematica by Whitehead and Russell, Quine, and others. This notation means the same thing as the tan(A) notation used by others but without context-dependent notational ambiguity.
Deciding on a proof strategy for reccot
Now we need to figure out how to prove this goal.
In this example our basic strategy will be to expand the tangent and cotangent into sines and cosines, then show that the results are equal. We’ll again show going forwards.
Note that in real proof efforts you’ll often try many different approaches.
Beginning to expand the definition of tangent
We know we’re going to need more information about the tangent and cotangent. So let’s retrieve their definitions.
Let’s first find the definition of the tangent.
Select the icon
That produces a huge number of results. We could scroll through many pages to find what we want and select it. In this case, let’s instead be more specific in our search request. We want a statement that shows that the value of the tangent is equal to something using the sine and cosine.
While still in the search dialogue, modify the search pattern to say ( tan ` = sin cos and click on Search.
Notice that this more specific search quickly finds the definition
we want without many irrelevant results.
In this case it finds a statement named tanval (value of the tangent).
The default search pattern language is very simple. A pattern should consist of a space-separated sequence of one or more symbols (currently only constants and typecodes are allowed). Statements will only be considered matches if their conclusion part has the same constants in the same order, with optionally 1 or more other symbols before the pattern, between the requested symbols, and after the pattern.
This definition of the value of a tangent, named tanval,
includes an implication.
There’s a good reason for this.
The tangent of some value A is the sine of A divided by the cosine of A,
and therefore it’s undefined when the cosine of A equals zero.
While still in the search dialogue, select the box next to
tanval. and press “Choose Selected”.
Interlude: Work variables
We have a new step, as expected. However, it has a form we haven’t seen before:
|- ( ( &C1 e. CC /\ ( cos ` &C1 ) =/= 0 ) ->
   ( tan ` &C1 ) = ( ( sin ` &C1 ) / ( cos ` &C1 ) ) )
The symbols beginning with “&” are what’s called “work variables”.
Work variables often show up when creating proofs.
The fundamental issue is that although a theorem or axiom may use a variable
(such as A), those variables can be replaced with other expressions
when they are used.
In this case,
the original tanval showed what the results are when A is the argument,
but we aren’t limited to using A; we can use any expression that
produces a class.
In cases where metamath-lamp cannot be certain of exactly what you want, it
will create work variables that you can then replace (substitute)
with whatever you do want.
When using set.mm or iset.mm, you’ll see work variables of certain forms:
- &Wnumber : an expression that is a well-formed formula (wff),
in short, some value that is true or false.
This could be a variable that is a wff, such as
ph(the ASCII representation for “𝜑”),ps(for “𝜓”),ch(for “𝜒”), orth(for “𝜃”). But it could be any other wff expression, such asph /\ ps. - &Cnumber : an expression that is a class.
Any set is a class (though not all classes are sets).
This could be a variable that is a class, such as
A,B,C, and so on. It could also be an expression that is a class, such as ( sin ` A ). - &Snumber : a set variable.
This represents a variable that represents a set, such as
x,y, orz. This can’t be an expression (class variables are used in this case). Set variables can show up immediately after quantifiers; requiring them to be a variable ensures that they are syntactically valid.
In work variables the number will increase from 1 as needed to keep different work variables distinct..
If you look carefully you’ll see that the “Variables” field in the proof display has new information. What it’s saying is that there’s a work variable of type “class” with the name “&C1”. This field is helpful when proofs get long, because it will show you in one place what work variables are not handled.
Metamath-lamp can export proofs with work variables (they will be treated like local variables and defined in the generated proof). However, many in the Metamath community would not accept this into a Metamath database, so in most cases you should change work variables to something else before exporting a proof.
As we’ll see in a moment, we’ll use the
icon ![]() (substitution‡)
to replace
the work variables with symbols or expressions so we can complete
the proof.
(substitution‡)
to replace
the work variables with symbols or expressions so we can complete
the proof.
Completing the work to expand the definition of tangent
We need to replace each work variable with an expression of the correct type
that will help us prove our goal.
What should we do in this case?
Well, the goal is going to involve the tangent of A, so we know
we’re going to specifically need the tangent of A.
That means that we need to replace all instances of &C1
with the value A. This process of replacing values is called
applying a substitution‡.
Select the icon
(substitution‡). In “Replace what” enter &C1 and in “Replace with” enter
A… once that’s done, press “Find Substitution‡”. The system will check if this is valid; in this case, it could that there was only 1 way to interpret this command and that the result is valid. It will show you that you can change &C1 toA- pressApplyto apply the change.
Expanding the definition of cotangent
We also need the definition of cotangent.
You may have noticed that the definition of the value of tangent
was named tanval - that suggests a naming convention that we could use
to make searching easier. In set.mm, the definition for finding a value
of a function is usually the function’s abbreviated name followed by val.
Let’s exploit that.
Select the icon
cotvaland click on the iconcotvaland click on “Choose Selected”.
We again have a work variable, and we already know what its value should be, so let’s deal with that now.
Select the icon
A… once that’s done, press “Find Substitution‡”. It will show you that you can change &C1 toA- pressApplyto apply the change.
What does reciprocal do?
The goal involves a reciprocal, so we need to find an existing theorem
that proves “what a reciprocal does for me”.
What I want to find is something like ( 1 / ( A / B ) ) = ( B / A ),
which presumably will only be acceptable if A isn’t zero and B isn’t zero.
Select the icon
class =/= 0 /\ class =/= 0 -> 1 /
Once done entered, click on Search.
Searching produces a paged list of results. However, by giving a very specific search pattern we’ve narrowed the results to a short list to consider.
Notice the word class in the search. You can use a typecode in a
search, which will then match any variable with the same typecode.
In the set.mm database, class represents a class variable.
We could have found exactly what we wanted by being more specific, such as by using this pattern, but of course specific patterns are longer:
class =/= 0 /\ class =/= 0 -> ( 1 / ( class / class ) ) = ( class / class )
After looking at my options I find recdiv and that is
what I want!
Select the checkbox to the left of
recdiv- then scroll to the bottom and click on “Choose Selected”.
Now we have two work variables, representing the numerator and denominator of the fraction being reciprocated. Notice that the “Variables” field lists these two variables.
We’ll come back this in a moment.
Matching the goal’s antecedent for tangent
The goal is an implication; the antecedent of this implication has 3 requirements. However, the definition of the tangent value and cotangent value don’t exactly match the goal antecedent. We need to prove that we can use these values with the exact antecedents in our goal.
This will be easier to do if we duplicate an existing step and modify it.
Select the checkbox to the left of the expression using
tan. Press the icon
An easy way to modify the new step’s statement is to use metamath-lamp’s mechanisms for copying and pasting portions of text (aka “fragment selectors”).
Using Alt+left click, select the second parenthesis of the goal statement. This will smartly select a syntactically complete portion of the statement and bring up a fragment selector dialogue below the statement.
The fragment selector dialogue has icons to smartly expand the selection, shrink the selection, add a new step above with that selection, add a new step below with that selection, copy the selected text to the clipboard, edit that text, and unselect (close the fragment selector dialogue).
To get an idea of what the fragment selector dialogue can do, press on the leftmost icon icon
(expand selection), which expands the selected sequence of symbols. Now select the icon
(shrink selection), which shrinks the selected sequence of symbols. Note that the tool is selecting the symbols based on the syntax of the symbols, to the next larger or smaller but syntactically valid sequence.
You can even have fragment selectors enabled on more than one step.
This makes it easy to pre-select fragments and then press the
icon ![]() (substitution‡)
to fill in both the “Replace what” and “Replace with” fields.
(substitution‡)
to fill in both the “Replace what” and “Replace with” fields.
In this case, we want to make a copy of the selected text in the goal, then paste that into the relevant section of the new statement.
Press the icon
(copy to clipboard) under the goal statement. Now use Alt+left click on the second parenthesis of the new statement we just created, selecting its antecedent. Press the icon
(edit), then use your system’s paste command (“control-V” on most computers, “command-V” on Macintoshes) to overwrite the selected text with the text in the clipboard. Press Enter (Return) to save the modified statement.
We now have a new statement, showing value of a tangent is still valid given the antecedent of our goal:
|- ( ( A e. CC /\ ( sin ` A ) =/= 0 /\ ( cos ` A ) =/= 0 ) ->
     ( tan ` A ) = ( ( sin ` A ) / ( cos ` A ) ) )
It turns out that metamath-lamp can immediately prove this new step.
Press the the icon
You can click on any bold P to show the justification for each step with a green checkmark; press the same bold P again to hide the justification.
Matching the goal’s antecedent for cotangent
Let’s do the same thing with the definition of the value of the cotangent, showing we can use this definition even given the antecedent of the goal.
Select the checkbox to the left of the expression using
cot. Press the icon
We now have several steps. All the steps are proved (have green checkmarks) except the goal statement.
Handling the reciprocal of the cotangent
Our goal is about the reciprocal of the tangent, not the tangent itself.
So let’s modify the definition of the value of the cotangent to show the value of the reciprocal of the tangent. Remember, in algebra you can do what you want on the left-hand-side of an equality, as long as you do the same thing on the right-hand side.
So create a new step, based on of the value of the cotangent that has the same antecedent as our goal, that shows the value of the cotangent.
Select the checkbox on the left for the step with this statement:
|- ( ( A e. CC /\ ( sin ` A ) =/= 0 /\ ( cos ` A ) =/= 0 ) ->
     ( cot ` A ) = ( ( cos ` A ) / ( sin ` A ) ) )
Let’s duplicate this step. Press the icon
( 1 / ... )resulting in:
|- ( ( A e. CC /\ ( sin ` A ) =/= 0 /\ ( cos ` A ) =/= 0 ) ->
     ( 1 / ( cot ` A ) ) = ( 1 / ( ( cos ` A ) / ( sin ` A ) ) ) )
When you’re done, press the icon
Clearly we’re going to need to simplify the reciprocal of the cosine over the sine. We already have a step that does this, but we need to set its work variables appropriately.
If we were using mmj2, we could just edit one of the work variables, replace with its new value, and unify. Metamath-lamp doesn’t support this due to a known current limitation. Instead, metamath-lamp expects you to use the “replacement” icon. Let’s replace the work values so that they will work with this expansion of the reciprocal of the cotangent.
Let’s replace the work variable &C1:
Press on the icon
Let’s replace the work variable &C2:
Press on the icon
Again, all but the goal steps are proven.
Proving the preconditions we need
The statement where we replaced the work variables is at least now relevant, but its antecedent is not what we need - it’s not the same as the goal’s antecedent. We’ll need to show that the goal’s antecedent implies the antecedent of the statement we want to use.
For example, the goal says A e. CC (A is a complex number)
but the earlier statement’s antecedent says
( cos ` A ) e. CC.
Now, we know that if a value is a complex number, then its
cosine is a complex number. Is this information already in the
set.mm database? Let’s find out. Let’s look for that statement
and, if it exists, add it.
Make sure no step is selected. Select the magnifying glass, enter the pattern e. CC -> cos e. CC and search. You’ll see a list including
coscl- selectcoscland press “Choose Selected”. This has a work variable; press on the iconA(remember to select “Find Substitution‡” and then “Apply”). We now have |- ( A e. CC -> ( cos ` A ) e. CC ) as a statement.
We’ve noticed another naming convention in set.mm; a name ending in “cl” is often used to indicate a class. Let’s do it again.
Select the magnifying glass, search for label
sincl, and search. Selectsincl(notasincl!). Substitute &C1 withA. We now have |- ( A e. CC -> ( sin ` A ) e. CC ) as a statement.
Now we can start simplifying the reciprocal of the division.
Select the long step involving the reciprocal which reads:
|- ( ( ( ( cos ` A ) e. CC /\ ( cos ` A ) =/= 0 ) /\
       ( ( sin ` A ) e. CC /\ ( sin ` A ) =/= 0 ) ) ->
     ( 1 / ( ( cos ` A ) / ( sin ` A ) ) ) =
       ( ( sin ` A ) / ( cos ` A ) ) )
Duplicate this step by pressing the icon
A e. CC, Press Enter, and press the iconA e. CC, Press Enter, and press the icon
This antecedent of this latest new statement is still not exactly the same as the goal antecedent, but it’s very close. It’s likely the tool can easily complete that, so let’s create a new statement based on the one we just created but has the exact same antecedent as the goal.
Select the latest new step with this (long) statement:
|- ( ( ( A e. CC /\ ( cos ` A ) =/= 0 ) /\
     ( A e. CC /\ ( sin ` A ) =/= 0 ) ) ->
     ( 1 / ( ( cos ` A ) / ( sin ` A ) ) ) =
       ( ( sin ` A ) / ( cos ` A ) ) )
Duplicate the step. Use Alt+left-click to click on the second parentheses of the goal statement (so we can duplicate its antecedent) and click on the “copy” icon. Select the second parenthesis of our new statement, press Edit, and paste with control-V (or command-V). Enter, then press the icon
The unification worked!
In fact, that proved more than the new step.
Now label reccot shows a green checkmark, which means we’ve
completed the proof.
There are many other ways we could have proven this, and in fact, we could have done some of this with less manual work by more aggressively using backwards search. Many steps “simply worked” in this example, but there’s no shame in creating intermediate steps that aren’t instantly proved. If there are intermediate steps you need to prove to lead to the goal, just apply the same process - repeatedly work to prove those intermediate steps.
Proof: Principle of the syllogism (syl)
Let’s prove something more basic. Let’s prove that if phi implies psi, and psi implies chi, then psi implies chi. In short, let’s prove that implication is transitive.
Russell and Whitehead call this claim “the principle of the syllogism”;
others sometimes call this law a “hypothetical syllogism”.
This has been
proved in the set.mm database as theorem syl.
This proof involves using hypotheses, so that means we’ll learn how to create hypotheses in metamath-lamp.
Setting up the context and goal step for syl
Let’s again load the set.mm database, and stop before syl:
Select Source type “Web”, Alias “set.mm:latest”; after confirmation this loads the given database. Now under scope select “Stop before” and enter the label
syl. Finally, apply changes to the context.
Now let’s add the conclusion:
In the Editor select the icon
|- ( ph -> ch )and press Enter (Return). Click on the step label, change it tosyl, and press Enter.
However, this statement isn’t always true; it’s only true when other statements are true. Those other statements are termed “hypotheses”; let’s add them.
In the Editor select the icon
|- ( ph -> ps )and press Enter. Metamath-lamp normally presumes that a new step describes a provable statement (that is, its step type is a “P”). However, this is a hypothesis instead. Use Alt+left click to select the P on that line. Note: on some keyboards “Alt” is labelled “Opt” or “Option”. On the drop-down select “H” (hypothesis). Notice that changing a step into a hypothesis automatically moves it above the goal. Click on the label and rename it tosyl.1.
We now have a hypothesis! Let’s add the other one:
In the Editor select the icon
|- ( ps -> ch )and press Enter. Use Alt+left click to select the P on that line. On the drop-down select “H” (hypothesis). Again, this change causes the step to be automatically moved above the goal. Click on the label and rename it tosyl.2.
Notice that it’s already ordered in a reasonable way. If you ever wanted to change the order of statements, you can select the step(s) to move using the left-hand-side check box, then move them up and down using the “up” and “down” icons. However, there’s no need to reorder these statements.
Note: Every hypothesis and goal label
is also database label, so it must be unique in the database.
It cannot match a math symbol token (like 1), assertion label,
or hypothesis label.
The convention in set.mm, as shown above, is for hypotheses to be labelled
as the name of the goal + “.” + an integer starting from 1.
You don’t have to worry about incorrect labels, though.
Metamath-lamp validates labels you use
(it currently hypotheses and
will soon validate goals),
and it will show an error message if the label
is in use in the current context.
Easy proof of syl
Let’s prove syl the easy way.
Metamath-lamp’s bottom-up proof tool can’t automatically prove all
proofs, but it is able to find some proofs automatically, especially
when it can use many theorems that have already been proved.
Select just goal
syl, and press the iconimim2iandax-mpthat completely proves the claim. Select that one (using the checkbox on its left) and click on “Apply selected”.
Notice that metamath-lamp has added an intermediate step (with label “1”) to prove this :
|- ( ( ph -> ps ) -> ( ph -> ch ) )
Also, note that this new step and the final goal
syl have green checkmarks.
The most important thing is that our final goal has a green checkmark,
meaning the goal is fully proved!
You can left-click on its green checkmark to get a final proof
that could be used in a final database.
Hard mode: Proving syl using only axioms
If you thought that was too easy, let’s make it more challenging.
Let’s prove syl using only axioms.
Most people wouldn’t create proofs with only axioms, but doing this
will help us illustrate ways you can use metamath-lamp.
In particular, we’ll show you how to work backwards from a step.
We’ll start with our current state, including the intermediate step
that metamath-lamp found.
Now change the context so it only includes the axioms
modus ponens (ax-mp) and the propositional logic axioms
ax-1, ax-2, and ax-3, not anything after them:
Select at the top the context bar showing “Loaded:…” text. Change its scope to “stop after” label
ax-3. Click “Apply changes”.
We now see an error after label 1, saying “The label ‘imim2i’ doesn’t refer to any assertion.”
Click on the P of step 1 to reveal the specific reference that it was using (erroneously) to justify this step’s statement.
It says syl.2 : imim2i which means that our claimed justification for
step 1 was to use assertion imim2i with syl.2 as its hypothesis.
In our modified context we can’t use imim2i, in fact, we can’t use any
assertion after ax-3.
Let’s eliminate this justification:
Under step 1 is its justification; click on the trash can next to it to delete the justification. Then click on P to hide the now-empty justification.
Let’s unify and see what happens:
Click on the icon
The final syl step has a symbol “~”; this means that this particular
step is justified on its own, but it depends on something else that
is not transitively justified.
You can click on the P marker after syl to see that syl depends
on two other statements, syl.1 and 1, and uses ax-mp with
those hypotheses to justify this step.
This is a perfectly fine use of ax-mp, and syl.1 is a hypothesis
(so it’s assumed true for its purposes).
However, this justification depends on 1 which isn’t currently proven.
If you looked at this,
click again on the P marker after syl to hide these details.
Let’s work on proving step 1.
Let’s try backwards proof.
Select step 1 by clicking the checkbox to its left. To start a backwards proof, press on the icon
The bottom-up prover will show us some options.
It shows several ways to apply ax-mp (modus ponens), including
cases where a hypothesis is directly used as one of the claims.
Sometimes it’s not clear which alternative (if any) is worth trying,
in which case, you may need to try out different approaches to see
if they lead anywhere.
In this situation the direct applications of the hypothesis
don’t look to me like they’re going to lead to a proof.
So I’m going to select the option with a wff metavariable &W1
because that seems more promising.
Click on the option that includes &W1 and use “Apply Selected”.
We now have these statements:
3  P  |- ( &W1 -> ( ( ph -> ps ) -> ( ph -> ch ) ) )
2  P  |- &W1
Statement 3 looks suspiciously like axiom ax-2, which states:
( ( ph -> ( ps -> ch ) ) -> ( ( ph -> ps ) -> ( ph -> ch ) ) )
Unfortunately, metamath-lamp’s current unifier doesn’t notice that
these can be unified, so the bottom-up prover won’t help us here.
The tool mmj2 can unify this statement
with ax-2 (mmj2 has a more powerful unifier).
Unfortunately, metamath-lamp’s current unifier is only unidirectional, that is,
it can only substitute in one direction to find a match.
In the technical literature the current metamath-lamp “unification”
algorithm is often called “matching”
instead of being considered full syntactic unification.
There are some
discussions about removing this limitation in metamath-lamp,
but for now we’ll need to work around this.
With a little extra work we can give metamath-lamp the information it needs.
Let’s assume that we know we want to use ax-2 to prove this.
One approach would be replace the
work variable “&W1” with the expression required by ax-2, namely,
( ph -> ( ps -> ch ) ).
Here’s how you could do that, but note that we’re going to cancel
instead of completing this step:
Press the icon
( ph -> ( ps -> ch ) )and then press Return. Click “Find Substitution‡” button; metamath-lamp will show one possible substitution‡. You could click on the “Apply button and then unify, but don’t; select Cancel instead.
That would have proven step 3 using ax-2. However, if the expressions were more complex it might be hard to make sure we were connecting them the right way.
A more general approach would be to add the step we want to use, and then
perform substitutions‡ until we can unify them.
This is a better approach for more complicated situations, so let’s see it.
First, let’s bring in a step that uses the assertion we wish to use
(in this case ax-2):
Select the magnifying glass (“Search”), enter the label
ax-2and press “Search”. Selectax-2and press “Choose Selected”.
We have added a new step 4, which uses ax-2 but with work variables:
|- ( ( &W3 -> ( &W4 -> &W2 ) ) -> ( ( &W3 -> &W4 ) -> ( &W3 -> &W2 ) ) )
We are now going to modify steps 3 and 4 until metamath-lamp can unify them. The key feature we’re going to use is that you can use the statement fragment selectors to simultaneously select two fragments, which may include multiple work variables, and then use “replace”. Replace will use the two selected fragments, making this process much easier.
Use Alt+click to select, in step 4, the last
->.
The statement fragment selector dialogue has appeared under step 4 and we now have this fragment selected:
( ( &W3 -> &W4 ) -> ( &W3 -> &W2 ) )
You could use the dialogue to increase or decrease the size of the fragment, but we don’t need to. Now let’s select the equivalent statement fragment in step 3:
Use Alt+click to select, in step 3, the third
->.
Another fragment selector dialogue has appeared under step 3 and it has this fragment selected:
( ( ph -> ps ) -> ( ph -> ch ) )
If you didn’t pick the right fragment, use alt+click again to get the correct selection.
Note: you can select two fragments at the same time; you can also select two multiple statements. The ability to select two different fragments or two different statements simplifies replacement.
Now we can use replacement:
Select the icon
The two selected fragments have been copied into the fields. The earliest selected step is the “Replace what” and the later step is the “replace with”; in this case that’s what we want.
Click on “Find substitution”. Notice that it shows a valid substitution‡ that replaces multiple work variables.
Again, notice that “Replace what” doesn’t need to be a single work variable. It can be an expression, one that even includes multiple work variables. If there are multiple work variables, and you apply the change, all will be replaced as necessary throughout the proof.
Click on “apply”. Notice that multiple work variables have been replaced.
We now have these two statements:
4 P |- ( ( ph -> ( ps -> ch ) ) -> ( ( ph -> ps ) -> ( ph -> ch ) ) )
3 P |- ( &W1 -> ( ( ph -> ps ) -> ( ph -> ch ) ) )
Now let’s do another replacement to make steps 3 and 4 even more similar.
Use Alt+click to select, in step 3, the initial work variable &W1 (only that work variable should be selected). Use Alt+click to select, in step 4, the first
->.
The second Alt+click highlighted this fragment in step 4:
( ph -> ( ps -> ch ) )
Click on “Find substitution‡”.
Again the two fragments are copied in.
However, in this case the order is the opposite of what we wanted,
because we want to replace a work variable with an expression
(not the other way around).
The default is to use the earlier step first.
In this case that’s the opposite of what we wanted, so we’ll
swap them by pressing the
icon ![]() (reverse)
to the right of the “replace what” field.
(reverse)
to the right of the “replace what” field.
Press the icon
(reverse) to swap the field contents, press “Find substitution‡”, then apply.
Now both steps 3 and 4 are the same:
|- ( ( ph -> ( ps -> ch ) ) -> ( ( ph -> ps ) -> ( ph -> ch ) ) )
In fact, metamath-lamp is complaining that the two statements are equal! That’s not a problem, that’s what we were trying to do. Let’s merge them.
Select step 3 and click on the “merge” icon. Among the “use” options select using 4 (which uses
ax-2), so we can keep the connection toax-2. Step 3 is gone, now it’s all step 4. Press on the icon
We’re getting close! Step 4 is proven, using ax-2. However, step 2 is not yet proven, so the whole proof isn’t done. Select step 2, and do a bottom-up proof of it as well.
Select step 2, press on the icon
ac-mpthat proves all steps; select it and “apply selected”.
Congratulations! We now have a proof of syl by only using
axioms directly.
Creating this proof by only using axioms let us try out some features of metamath-lamp. That said, most of the time you won’t want to limit yourself to just axioms. Proofs are shorter, clearer, and easier to understand if you create theorems of more basic claims, and slowly build up from those simpler theorems to more complex claims. It’s also much easier to create each proof.
Creating your own examples from existing proofs
An excellent way to learn how to use metamath-lamp is to select a database (such as set.mm and iset.mm) and pick an existing proof in it. Then load the database and stop reading just before that proof. Try to create your own proof, consulting the known proof when you get stuck.
If you’re recreating an existing proof, and stop reading before that proof, you can (and in most cases should) reuse the same labels for the hypotheses and goal. The current context won’t include the labels of the proof you’re recreating, so metamath-lamp won’t complain about it. If you’re intentionally creating an alternative proof of the same goal, for eventual use in the database, then you do need to use different labels.
Loading existing metamath-lamp proofs
You can use “import to JSON” to load worked examples of metamath-lamp.
For example, we have completed examples of these proofs available in JSON format:
You can also generate a URL that includes the proof state, and share that URL with anyone. When anyone views that URL, they will load that same state.
Notes about Metamath databases
As noted earlier, a Metamath database is a sequence of axioms and their associated proven theorems. The most widely supported Metamath database today is set.mm (classical logic with ZFC set theory), followed by iset.mm (intuitionistic logic witih intuitionistic set theory), and others are available. Each database has its own conventions and notations. The set.mm and iset.mm databases share many conventions and notations, so we’ll focus on those.
The set.mm general conventions and set.mm label naming conventions document its various conventions to encourage consistency.
Let’s discuss a few specifics.
We mentioned earlier that set.mm is picky about the placement of parentheses. Let’s explain the rules in more detail:
- When a function that takes two classes and produces a class is applied as part of an infix expression, the expression is always surrounded by parentheses. For example, the use of “+” in ( 2 + 2 ).
- Predicate expressions in infix form that take two or three wffs (a true or false value) and produce a wff are also always surrounded by parentheses, such as ( ph -> ps ).
- In contrast, a binary relation (which compares two classes and produces a wff) applied in an infix expression is not surrounded by parentheses. This includes set membership, for example, “1 e. RR” (1 is a member of the set of real numbers) has no parentheses.
The set.mm label naming conventions page discusses those conventions in more detail. In most cases, the name of a theorem is a concatentation of “label fragments” of the important part of its conclusion. Each label fragment as a meaning, e.g., “nn” for natural numbers, “re” for real numbers, “1” for the number 1, “gt” for “greater than”, “le” for less than, “an” for the boolean operation “and”, and so on. The label naming convention for a simple arithmetic expression is to use “p” for “plus” and “e” for “equals”. Most symbols are defined by an assertion named “df-NAME”, where NAME is the label fragment used. Note that in set.mm, “natural number” means an integer that is one or larger.
Thus, in set.mm, nnre represents “the natural numbers are real numbers”,
nnge1 represents “the natural numbers are greater than or equal
to 1”, and 2p2e4 represents “two plus two equals four”.
Conclusion of this user guide
This is the end of the user guide / tutorial portion of this guide. We hope you’ve found it helpful.
If you need more help on using the metamath-lamp tool or how to create proofs, the best place to go is probably the Metamath mailing list. We’d love to see more people creating proofs and getting them into metamath databases! There’s a lot to learn, but we would be delighted to help.
Reference manual
This is the reference manual portion of this guide. In this portion we will walk through various portions of the metamath-lamp user interface to help you understand how to use it. That includes some capabilities that might not be obvious.
Here we will discuss:
- Loading source Metamath databases to create the proof context
- Main tabs: Settings and Editor
- Editor tab
- Settings tab
Loading source Metamath databases to create the proof context
Before creating a mathematical proof using metamath-lamp, you must first load at least one Metamath database and decide how much of those database(s) to use. This creates the context of a proof - that is, the set of axioms, proven theorems, and so on that the proof is allowed to use.
One of the powerful benefits of the Metamath system is that it impose any particular set of axioms (such as those of logic or set theory). However, to create a proof, you need to start with some set of axioms, and typically you’ll want to build on other proofs that use those axioms. So we must first tell metamath-lamp what this proof is allowed to use.
The context is shown at the top of the UI. When metamath-lamp starts, it will tell you that no database/context is loaded. Select the “source type” of the database, which is:
- “web” - load from the world wide web. You then need to pick an alias (which database on the web).
- “local” - load from a local file. You then need to choose the file.
Most users will just choose “web” and use “set.mm:latest”. This is the current version of set.mm (aka the Metamath Proof Explorer), which is based on classical logic and ZFC set theory. This is the largest Metamath database.
Confirm as necessary. Once it’s loaded, you’ll need to pick a scope. A metamath database is a sequence of statements, and metamath-lamp will only let you use statements that are in scope. The scope options are:
- “Read all” - use all statements in the source.
- “Stop before” (label) - use all statements up to but not including the given label. If you want to practice re-proving some statement, use this and give the label of what you want to prove yourself. Trying to prove something already proven is a great way to learn how to use metamath-lamp.
- “Stop after” (label) - use all statements up to and including the given label. If you want to use statements up to some label and not beyond, this is how to do that.
You can select the
icon ![]() (add)
to add another source, and the adjacent
icon
(add)
to add another source, and the adjacent
icon ![]() (delete)
to remove a source. In most cases you won’t load another source.
A common use for adding another source
is if you’re using a public Metamath database as a starting
point, but have your own private collection of definitions and proofs
in your local file storage.
(delete)
to remove a source. In most cases you won’t load another source.
A common use for adding another source
is if you’re using a public Metamath database as a starting
point, but have your own private collection of definitions and proofs
in your local file storage.
Once you’ve selected all sources, select “Apply changes” to process these source databases. After it’s applied, the source selection section is hidden and you can start creating a proof with the proof editor.
Main tabs: Settings and Editor
Once you’ve loaded the context, at the top there is a tab bar with two tabs, “Settings” and “Editor”.
- The “Editor tab” is the main view that lets you see and edit a proof.
- The “Settings tab” lets you change the editor configuration to your liking,
CLick on the name of the tab that you wish to see, and that tab will be displayed below it. We’ll cover the Settings tab later; let’s first focus on the Editor tab.
Editor tab
The Editor tab lets you edit a proof; it starts empty. You will create a list of statements in the editor that will eventually result in a proof. This tab contains most of the tool capabilities, so there’s a lot to discuss here.
We’ll first cover its key UI capabilities from top to bottom, starting from the editor command icon bar. We’ll then discuss how to state the goal and hypotheses. We complete this section with detailed descriptions of some of the more complex dialogues in the editor tab. Here is the full list of subsections:
- Editor command icon bar - this is the topmost area in the editor tab, a bar with icons representing commands to modify the proof
- Fundamental proof information - this is the region under the editor icon bar for the description, variables, and disjoints.
- List of steps in the proof
- Fragment selectors - for selecting parts of a statement in the list of statements.
- How to state the goal and hypotheses - a summary of how to do this.
- Search patterns
- Replacement
- Proving bottom-up
- Unification
Editor command icon bar
At the top of the editor tab is the editor command icon bar. This is a bar containing icons, where each icon represents a command that can be performed to modify the proof. You can hover over an icon to see what the command does. Here are their icons and meanings:
| Icon | Meaning | Visual Description | Additional information |
|---|---|---|---|
| Select all | Checkbox | Select or deselect all current statements‡ | |
| Down | Down arrow | Move the selected statements‡ down the list | |
| Up | Up arrow | Move the selected statements‡ up the list | |
| Add new statement‡ | Plus sign | Type in the new statement | |
| Delete selected statements‡ | Trash can | ||
| Duplicate selected statement‡ | Circles behind “+” | Makes a copy of the selected statement‡ | |
| Merge similar statements‡ | Merge | Select one statement‡ | |
| Search | Magnifying glass | Add new statements‡ by searching for a pattern; see search patterns | |
| Substitution‡ | A with arrow | Apply a substitution‡ (aka replacement) to all statements; se replacement | |
| Unify | Hub | Unify all statements‡ or unify selected provable bottom-up. If no statements‡ are selected, attempt to unify everything. If one statement‡ is selected, open proving bottom-up dialogue | |
| Menu | 3 short horizontal lines aka hamburger | Menu of other actions |
Under the editor command icon bar is the fundamental proof information followed by the list of steps in the proof. After discussing the list of steps in the proof we’ll discuss fragment selectors, which let us easily select parts of a statement. We’ll then discuss how to state the goal and hypotheses. This will be followed by detailed discussions about some specific commands (how to specify search patterns, replacement, and proving bottom-up).
Fundamental proof information
Just under the editor command icon bar is fundamental proof information, specifically fields for its description, variables, and disjoints. You don’t need to fill in a description or variable list to begin a proof. In many cases you won’t need to specify disjoints for a proof either, but sometimes you do. Here is information on these fields.
Note: Click on the field name to edit the field. You can also select the editable field text, but the description field is odd - by default, you have to use Alt+left click to edit it, while just left click selects part of its text.
Description
This field can’t be edited with a simple left-click; you must use alt+left click.
Warning: At this time the description is not copied into the generated final (compressed) proof. That is an idea that is being considered.
Variables
This section shows a list of work variables and local variables, one variable per line. By default any variables no longer in use are removed.
Whenever a new work variable is created it will be shown in this list. Whenever a work variable is removed (e.g., by substituting it), it’s removed from the list.
If you’d like to give a variable a “local” name in the proof to make the proof clearer, you can do that by editing this field. You simply add a line with this format:
.NEW_LABEL TYPE VARIABLE_NAME
The “type” depends on the database, e.g., in set.mm it could be
class, wff, or setvar.
An example would be:
.loc1 class width
Notice the “.”. The period suppresses automatic deletion of the line; without it, if the variable is unused then entry will disappear.
Once local variable is defined, you can use its name instead of the global name.
If you generate a proof that uses the local variable name, the local variable is exported as part of the proof. If you don’t want to export the local variable, you can replace the local variables with global variables before generating a proof.
Disjoints
The disjoints field presents a list of disjoint variables, one disjoint expression per line. A disjoint expression (a text line) must be a list of two or more variables separated by commas. Disjoint variables are also called distinct variables.
An example of a disjoint field’s contents might be this list, representing three disjoint expressions:
x,y,F
x,y,u,v
The disjoint expression x,y simply means that
x and y must be disjoint variables (aka distinct variables).
This means that they may not be simultaneously
substituted with the same variable.
The disjoint expression x,ph means
variable x must not occur in the wff ph.
For more information, see the Metamath book.
List of steps in the proof
The list of steps of the proof follows the basic information about the proof.
By default, when the tool begins there will be no steps.
Typically the first step to be added is the step
to be proved (aka the goal step).
Use the
icon ![]() (add new statement‡)
in the editor command bar to add the goal.
Usually the goal is the last step, though metamath-lamp does
not enforce this.
(add new statement‡)
in the editor command bar to add the goal.
Usually the goal is the last step, though metamath-lamp does
not enforce this.
Each step is presented in the following left-to-right order:
- Box (step selector): Select this box to select or unselect this step. Many commands work on the “currently selected step(s)”, so it’s important to be able to select them all. Use the box in the editor command bar to select or deselect all steps.
- Proof status (if present): If there’s a green checkmark following the
step selector box, a recent unification has
confirmed that this step is proven given its context and its
previous steps.
If there’s a yellow tilde, that means that it’s partly but not
completely proved.
Any modification of a proof removes the checkmarks.
To regenerate the checkmarks, press
the icon (unify)
without selecting any particular step; this will
re-verify the steps and show checkmarks for the
steps that are proven.
Once you see a checkmark, you can see a compressed metamath proof of
that step by selecting its checkmark (generally you would do this on
the goal step). Once there, you can show or hide the proof table,
as well as showing only essential steps.
Non-essential steps are the steps showing how to create syntactic structures
and show that they are of the correct types.
Metamath-lamp can export proofs with work variables
(they will be treated like local variables and defined
in the generated proof).
However, many in the Metamath community would not accept work variables
into a Metamath database, so in most cases you should change work variables
to something else before exporting a proof.
- Label: This is the label for this statement. You should give your proof’s goal the label of what you intend to name it. Consider using the label “qed” for the goal step if you don’t know what name to use. Each hypothesis and the goal needs to have a unique label that isn’t already in the context being used (it can’t be a math symbol, label, or anything else). These labels (of the hypotheses and goal) are called “global labels”; the other labels in the proof are “local labels”. If you’re following the conventions of set.mm, the name of each hypothesis is the goal name followed by a period and an integer (starting with 1). For example, the proof of “mp3an3an” might have hypotheses with labels “mp3an3an.1” and “mp3an3an.2”. Note that this is different from the convention of the mmj2 tool, where hypotheses have labels of “h1” and so on. All other step labels (the “local labels”) are typically consecutive integers starting with 1, though they don’t need to be; a local label can be any sequence of alphanumeric characters. Again, if you want to add a generated proof to a Metamath database, the label of every hypothesis and goal must not already be used. The point of a label is to provide a simple way to uniquely refer to a statement.
- Step type (P/H): The step type is “P” if it’s a statement to be proven, and “H” if the statement is a hypothesis, Typically all hypothesis are listed first. By default, left-clicking on a “P” will reveal or hide the specific justification for the proved step (if any). By default, using Alt+left click will show a dialogue to let you select if this is a “P” or “H” statement type.
- Statement: This is the statement to be proven or is being
accepted as hypothesis.
In most cases this statement will start
with
|-(meaning “it is true that…”), followed by a space-separated sequence of symbols of the statement to be proved. An example of a statement is|- ( 2 + 2 ) = 4(two plus two equals four). You can edit the statement. By default, you can do this by clicking on the text with the mouse left button or by touching it using a touchscreen. Once you’re done, press the icon (save)
to save the edited statement, or the
icon
(save)
to save the edited statement, or the
icon  (cancel)
to not change the statement.
You can also select parts of a statement; by default you can do this
by using Alt+left click (“alt” is sometimes labelled “opt”).
For more about selecting parts (fragments) of a statement,
see the next section on fragment selectors.
(cancel)
to not change the statement.
You can also select parts of a statement; by default you can do this
by using Alt+left click (“alt” is sometimes labelled “opt”).
For more about selecting parts (fragments) of a statement,
see the next section on fragment selectors.
Fragment selectors
It’s very common when creating a proof to want to copy part of a statement. Therefore, metamath-lamp has mechanisms to make selecting parts of a statement very easy, especially in the presence of parentheses-like constructs. This mechanism is called a fragment selector.
By default, Alt+left click on a statements causes a fragment selector dialogue to appear and makes a selection based on the selected symbol. On some Mac keyboards “alt” is labelled “opt” or “option”. If you’d prefer a different mechanism, use the settings tab to change this.
Exactly what fragment is selected depends on the symbol you choose. If you select a parentheses-like symbol, it selects the expression that begins or ends with that symbol. If you select an infix symbol, it selects the expression immediately surrounding the infix symbol.
You can use the fragment selector dialogue as follows:
To get an idea of what the fragment selector dialogue can do, press on the leftmost icon icon
| Icon | Meaning | Visual Description | Additional information |
|---|---|---|---|
| Expand selection | Zoom in | Expand the selection to the next larger syntactic unit | |
| Shrink selection | Zoom out | Reduce the selection to the next smaller syntactic unit | |
| Add new statement‡ above | Arrow up from box | Create a new step above the current step with the selected statement fragment | |
| Add new statement‡ below | Arrow down from box | Create a new step below the current step with the selected statement fragment | |
| Copy to clipboard | Copy the fragment into the clipboard | ||
| Edit | Pencil | Start editing with current text selected | |
| Cancel | Circled X | Cancel (and close) this statement fragment dialogue |
Important: You can use a fragment selector on more than one step at the same time. In particular, you can use the fragment selector on two statements and then invoke replacement. Both fragments can be complex expressions when replacement occurs (they are not limited to single symbols or only one work variable).
How to state the goal and hypotheses
To prove something, you must first tell the system what to prove and any special hypotheses to use. To do that:
- Under the “Editor” tab”, press the “+” in the editor command icon bar to create a new statement‡. Enter the goal of the proof as its statement. Typically the goal’s statement will begin with the symbol “|-“ which means “it is true that”. Click on its step number if you want to rename the step name (typically this is named “qed” if you don’t have a better name).
- If there are hypotheses, press “+” to enter each one, and select the “P” using Alt+left click (or Opt+left click) to change “P” (provable assertion) into “H” (hypothesis). Put them in the intended order by selecting them (the box on the left) and selecting the up and down icons. You generally want the goal last.
You’re now ready to create a proof.
Important: The label of every hypothesis, as well as the goal,
is a database label.
Therefore these labels must be unique in the context.
The label cannot match a math symbol token (like 1), an assertion label,
or a label of any other hypotheses.
This is noted in the
Metamath book,
on the page 114, as it notes that
“each label token must be unique, and no label token may match
any math symbol token.”
The convention in set.mm is for hypotheses to be labelled
as the name of the goal + “.” + an integer starting from 1.
Note that the label of
individual proof steps (other than the hypotheses and goal)
don’t have to be unique in the database, because these labels
are local to the proof.
Let’s now look at details of some of the more complex dialogues in the tools
Search patterns
The icon ![]() (search)
enables you to search for a statement
that matches a given pattern, showing you matches.
You can then select a match and create a new statement from that match.
(search)
enables you to search for a statement
that matches a given pattern, showing you matches.
You can then select a match and create a new statement from that match.
The search pattern language is very simple, Note that search will only match on the conclusion part of an axiom or theorem (there is currently no mechanism to search hypotheses).
A pattern must be a space-separated sequence of one or more items. Each item must be a constant or a typecode that is valid in the database:
- A constant pattern only matches the same constant.
- A typecode pattern matches any variable with that typecode.
For example, in the
set.mmdatabase, the valid typecodes you can use in a pattern arewff(which will match variables likephandps),class(which will match variables likeAandB), orsetvar(which will match variables likexandy)..
Statements will only be considered matches if their conclusion part has the same matching symbols in the same order. There may be 1 or more other symbols before the pattern, 1 or more symbols between the requested items, and 1 or more symbols after the last matched item.
Therefore, a search for 0 -> will match the conclusion
|- ( ( 0 <_ A /\ 0 <_ B ) -> 0 <_ ( A + B ) )
because the conclusion has a 0 constant which is later followed by a
-> constant.
Replacement
Select the
icon ![]() (substitution‡)
to replace one
expression with another expression.
(substitution‡)
to replace one
expression with another expression.
This replacement will be applied to all statements in all proof steps!
After you select this icon you’ll be presented with a simple dialogue box to describe the substitution‡:
- In the “Replace what” field, enter what expression you want to change, (e.g., &C1 or ( &W1 -> &W2 )).
- In the “Replace with” field, enter what expression you want the first
expression to change into (e.g.,
Aor( ph -> ch )).
You can use fragment selectors to select one or two statement(s)
before starting a replacement.
When you press the replacement icon, a copy
of the first fragment (in displayed order)
will be placed in the “Replace what” field, while a copy
of the second fragment (if any)
will be placed in the “Replace with” field.
You can use the
icon ![]() (reverse)
to swap the field entries.
(reverse)
to swap the field entries.
You can also use the checkboxes on the left to select statements‡ before starting a replacement. The steps selected first will be copied into the “Replace what” field, and the step selected second (if any) will be copied into the “Replace with” field.
When you press “Find Substitution‡” the tool will determine if it can apply this replacement (that is, if the results are valid types everywhere and there are valid substitutions‡). If it is valid, you may select “Apply” to apply it.
Important: Replacements are not limited to a single symbol. Both fields can be complex expressions, possibly including more than one work variable. The tool allows you to use fragment selectors to select expressions to replace one complex expression with another.
Proving bottom-up
If you select one statement‡ and then select unify, you’ll enter a “proving bottom-up” dialogue. The bottom-up prover does a breadth-first search to find a proof of the selected statement‡ backwards (bottom-up) using the current context and the options set in this “proving bottom-up” dialogue.
It essentially works backwards to find a match, first with a single level, then with 2 levels (a statement that depends on another that also requires proving), and so on. It will stop once it finds a proof. In this version it uses no heuristics, and simply tries all allowed options as specified in the dialogue.
Typically you would modify the search options shown in this dialogue box and press “Prove” (or “Cancel” if you don’t want to search). When you press “Prove” it will repeatedly attempt various options in an attempt to prove the statement, showing the depth of the current search (e.g., “1/4” means it’s doing depth 1 searches out of a maximum of 4) and how many attempts it’s made so far. Press the circled “X” to stop its attempts to find a proof.
Proving bottom-up can take a long time, depending on the problem and the speed of the computer. The options selected here will affect whether or not it can find a proof, and the time it takes to do it, Therefore, selecting the right options for your circumstance in the proving bottom-up dialogue box can be very important. So first, let’s understand what it does
How bottom-up proving works
We can imagine the search space growing as a tree from the bottom, starting with the statement we wish to prove. All the statements we used to directly try to prove the current goal are considered “depth 1”. If those won’t work directly, we can try each depth 1 statement and then retry with many more statements, and so on. The following figure illustrates this
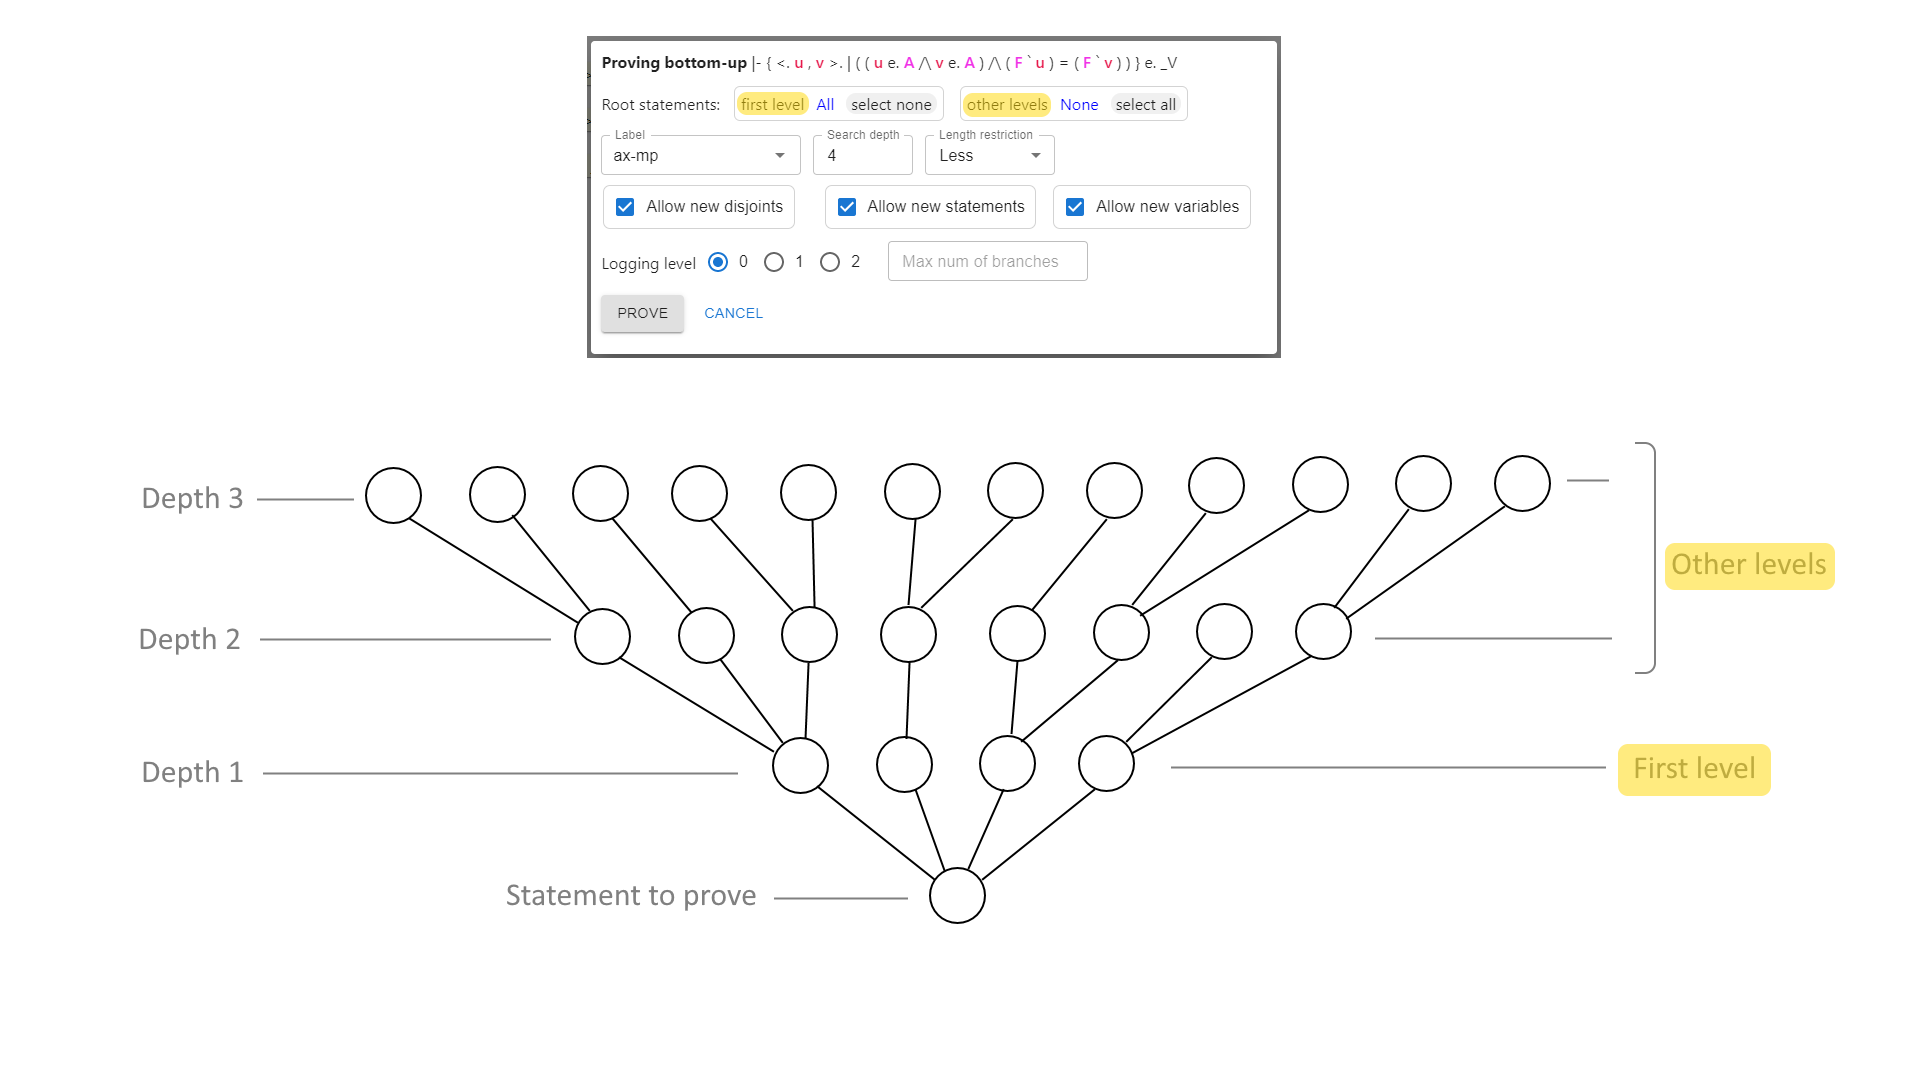
The “search depth” defines the maximum depth of the search. For example, the following figure shows the search space if the search depth is 2; the prover will stop searching once these options are exhausted:
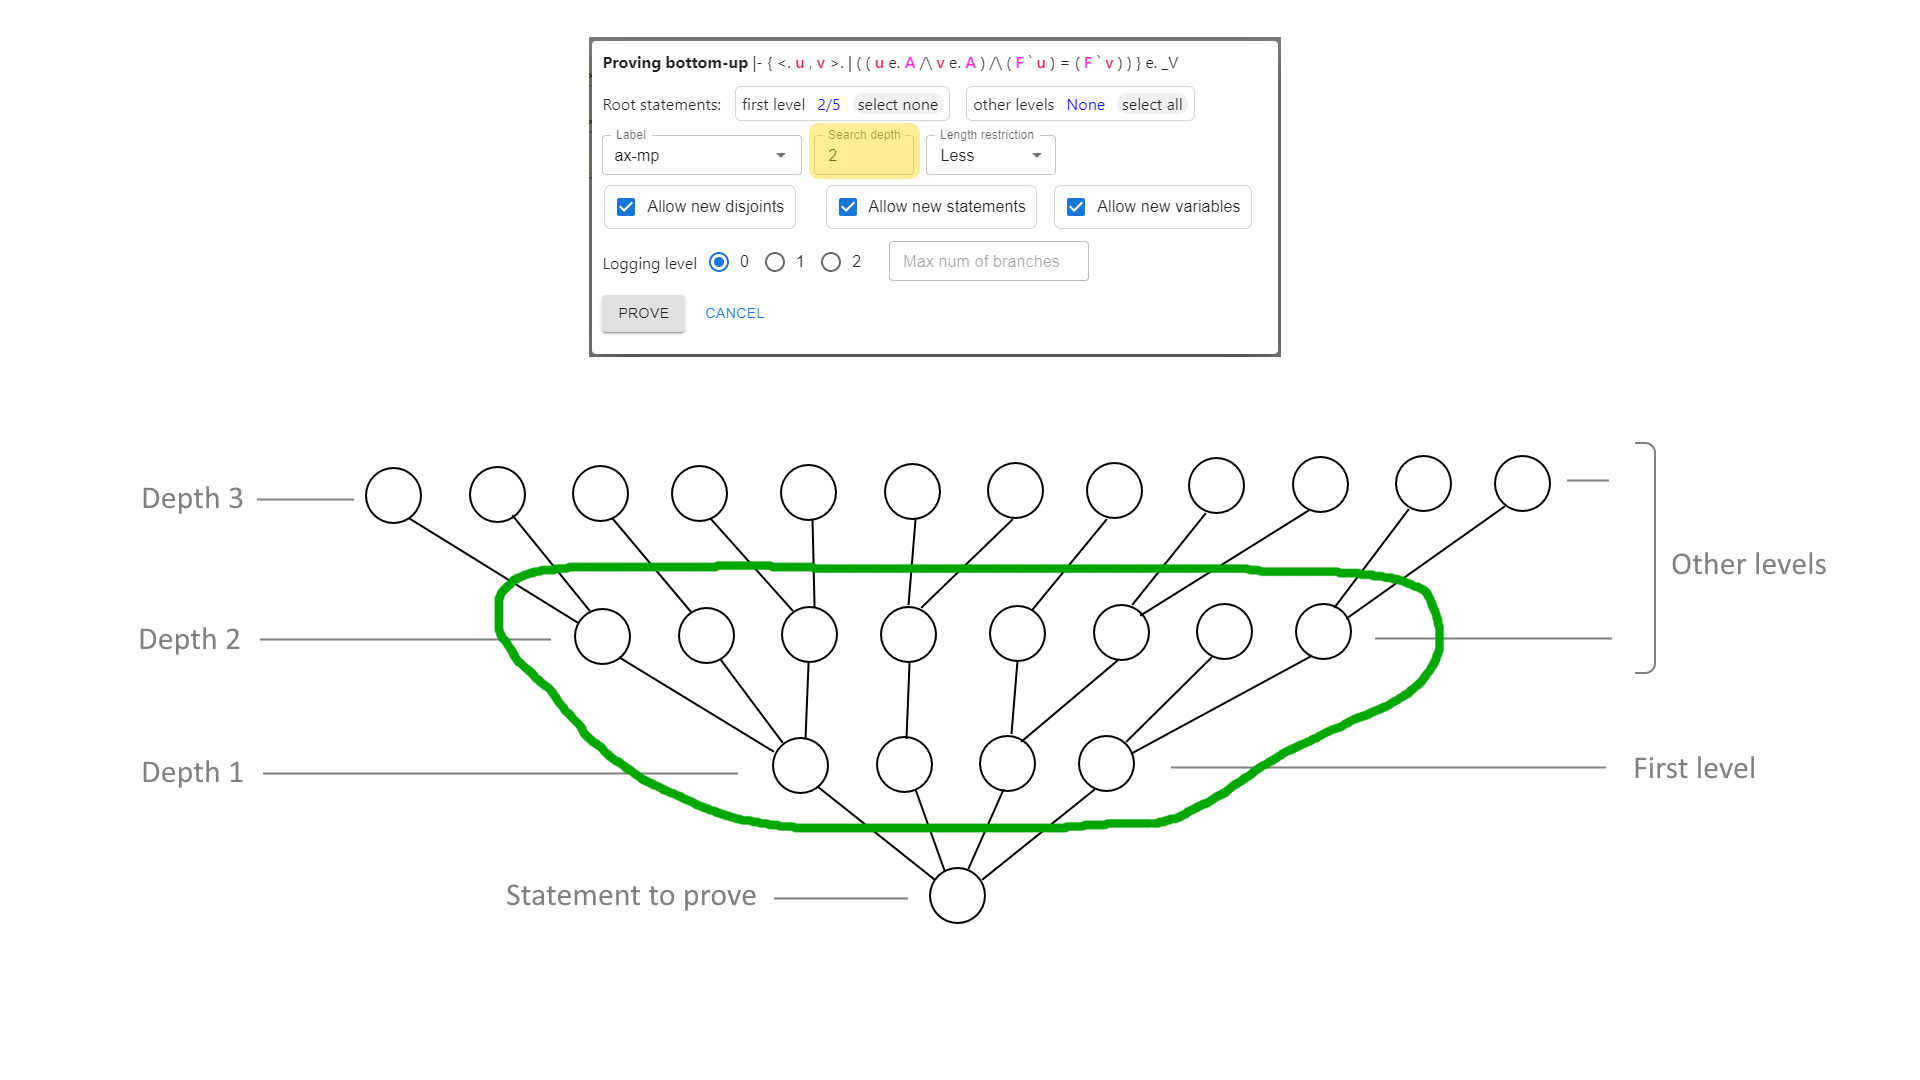
The “label” setting tells the prover to only use the given label at the first level; it has no effect on other levels:
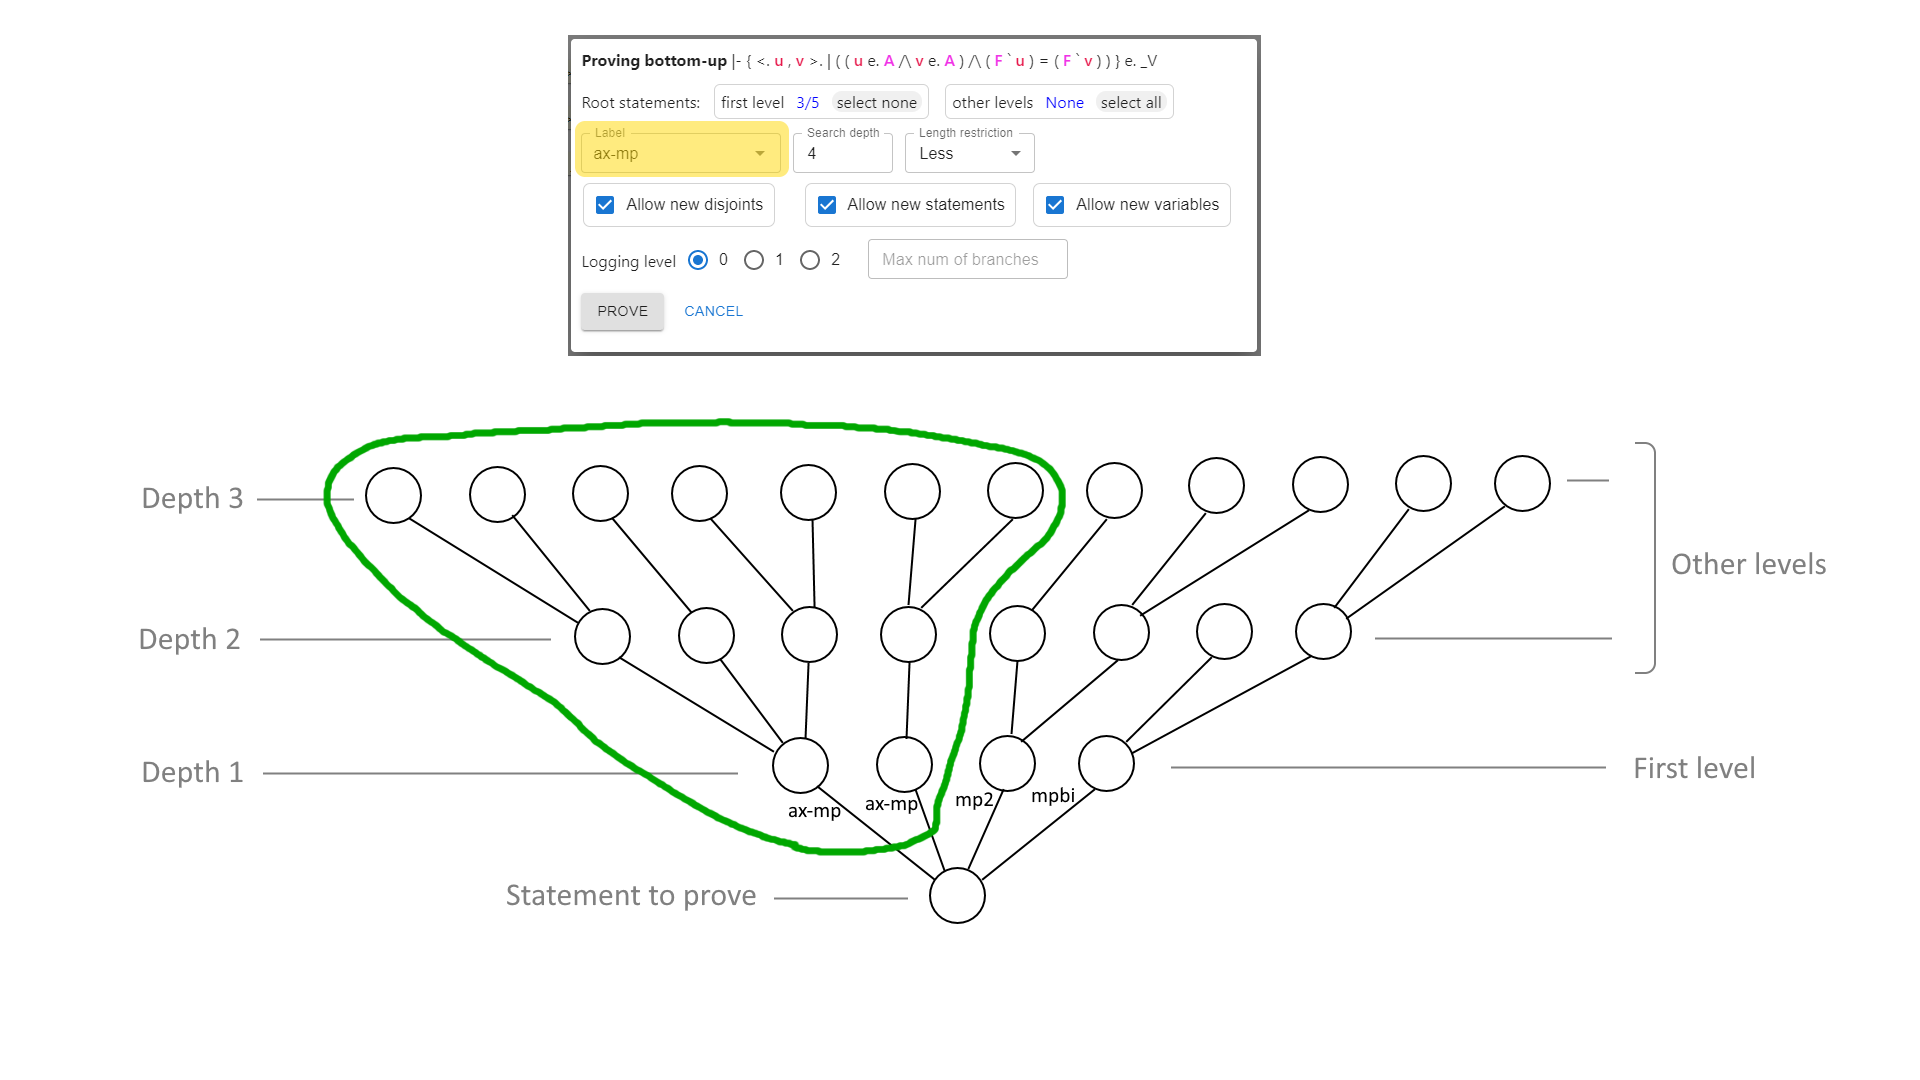
The “length” setting restricts which statements are considered based on their length. This setting is ignored on the first level. Let’s assume that statement A is derived from statement B and the “length” option is set to “Less”. The prover will only consider statement B if the length of statement B is less than the length of statement A. This heuristic can speed searches. The rationale is that a supporting statement is more likely to be useful if it is simpler, not more complicated, than the statement it supports. This figure illustrates the situation:
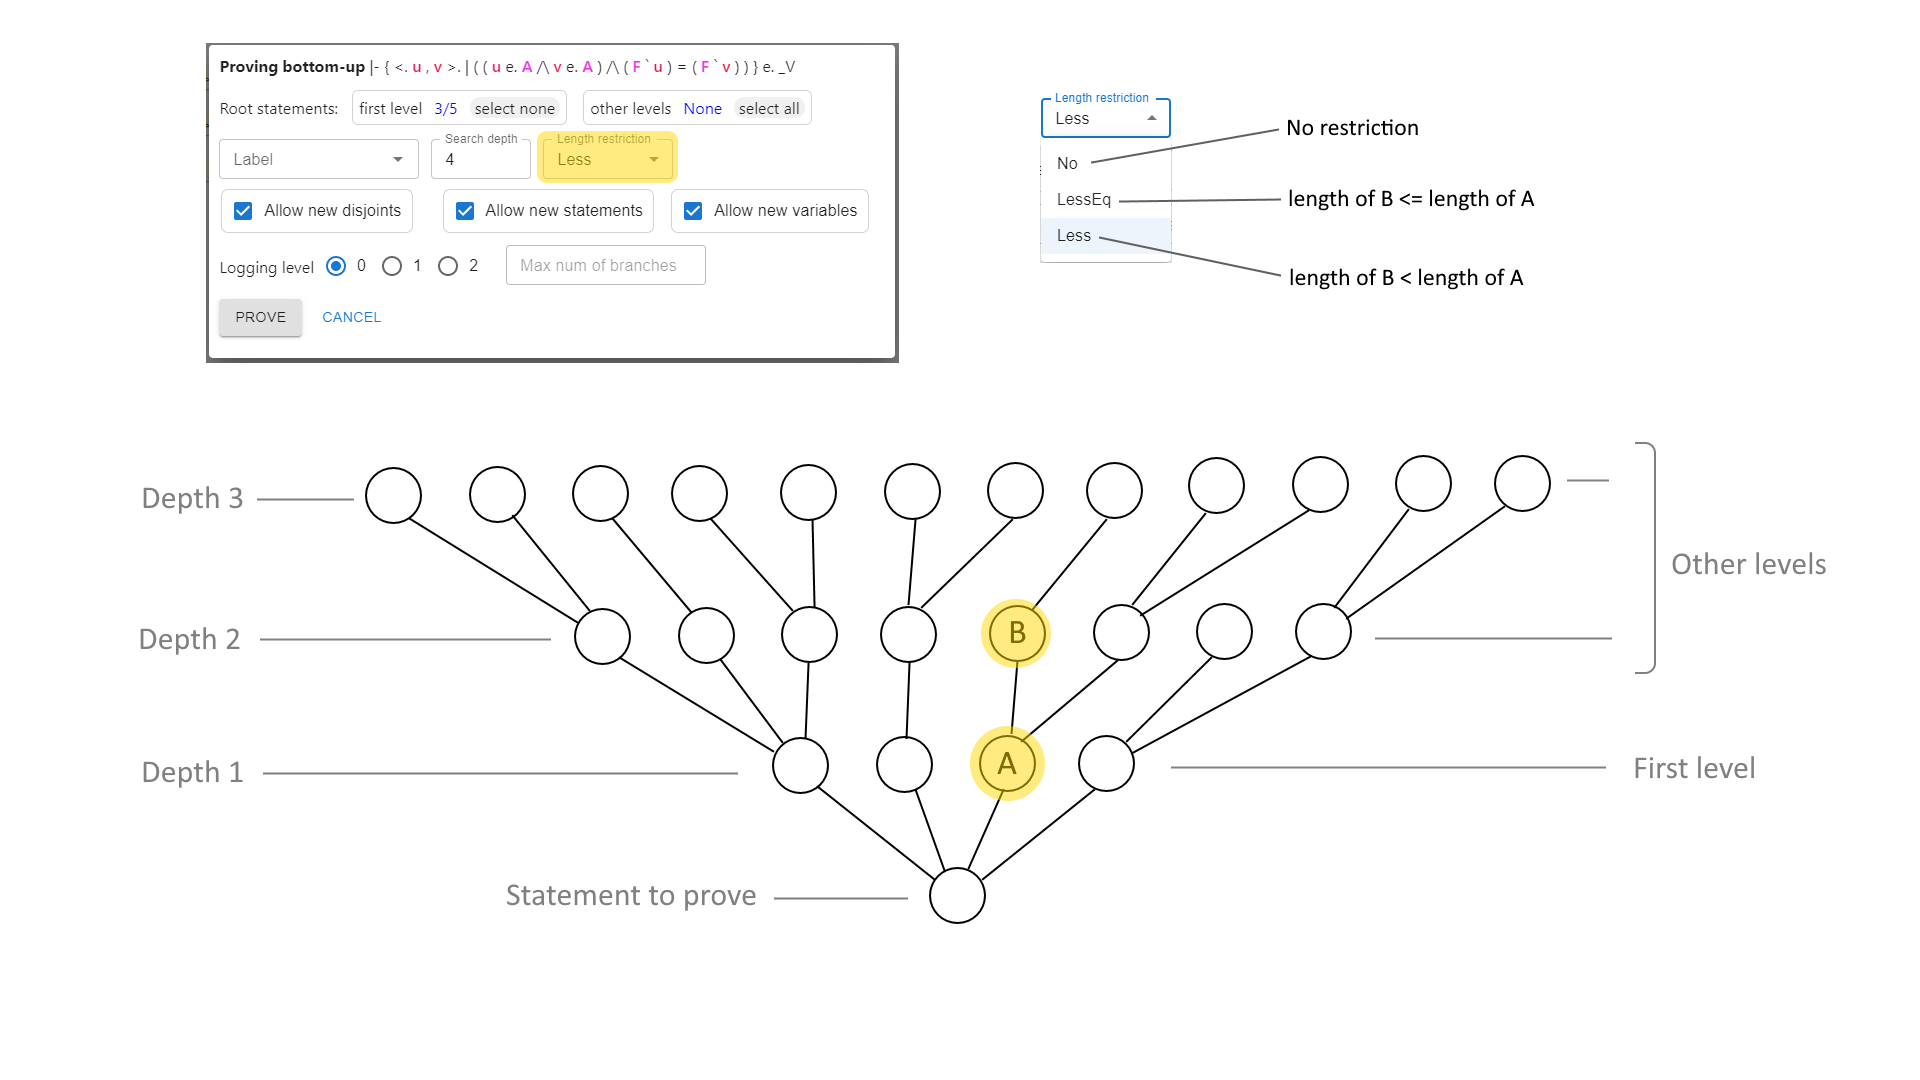
Now that we understand how bottom-up proving works, let’s review its dialogue box options.
Proving bottom-up dialogue box options
This dialogue has the following options:
Root statements (“first level” and “other levels”): These let you select which steps (if any) currently in the proof may be used (that is, derived from). If a statement‡ isn’t selected it will not be considered when creating the proof. The “First level” option selects the statements‡ that may be used to directly prove the root statement being proved, while “other levels” selects the statements‡ that may be used beyond this level. We can select “all” (all statements‡ may be used), “none” (no statements‡ may be used), or select a specific set of statements‡ that may be used. If it shows an expression like “1/8”, that means a specific set of statements‡ have been selected; the first number is the number of statements‡ that are permitted, and the second number is the number of statements‡ that could be permitted at this point. Click on the current value to select the statements‡ to permit. If the statement‡ to be proved is not currently proved, the “first level” is set to “All” (all statements‡ are considered) and the “other levels” is set to “None” (no statements‡ are considered after the first level). If this statement‡ is already proved, the “first level” will be set to the statements‡ that were used. Adding statements‡ that can be used will increase what the bottom-up prover can prove, but this will also increase the time it takes to find a proof.
Label: If set, this is the label of the only reference that is allowed to be used as a starting when proving bottom-up (backwards). Note that this value is set to the current justification’s reference if there is already a justification. If blank, any label may be used as the justification reference (and the system will try them all in the process of searching). This setting does not affect other levels (depths) of the proof.
Search depth: How deep the search is to go. Use of a single axiom or theorem is depth 1, a statement that requires a depth 1 search on a depth 1 search is depth 2, and so on. The default search depth value is 4. Larger numbers enable more automation but generally take exponentially more time.
Length restriction: This setting restricts what justifications are considered based on their length. This is a simple heuristic that, when used, can significantly speed up search. This setting is not applied to the first depth of the search, only to deeper levels, so it has no affect on searches with search depth 1. This setting can limit justifications to be considered based on whether or not they are less than the length (or less than or equal to the length) of the statement being justified. In many cases longer statements shouldn’t be considered at deeper depths, since that often implies increasing instead of decreasing complexity. Let’s imagine that the system is searching and has to search more than depth 1. It is currently searching to see if it can use jA, and is in turn working to determine if it will try to prove justification jB to support jA (that is, jA might depend on jB). A value of “Less” means that the system will only consider justification jB if its length is less than justification jA. A value of “LessEq” means that the system will only consider jB if its length is less than or equal to jA. A value of “No” means the system will not restrict anything; this is the most flexible (it can find more proofs) but may take much longer.
Checkbox Allow new disjoints: Allow the addition of new disjoints.
Checkbox Allow new statements‡: Allow the addition of new statements‡.
Checkbox Allow new variables: Allow the addition of new variables.
Logging level (0..2): If you select a log level beyond 0, then information will be recorded, which can be helpful for debugging. You may find this information helpful in modifying the search options further. If such information is recorded, a “show proof tree” button appears in the results of the bottom-up prover once it’s stopped. You can then explore the proof tree and see what the prover found. In particular, you may find that prover found a statement that “almost” worked, and then modify the search criteria further. If the logging level is 1 or more, you may enter the maximum number of branches, which will limit the number of branches checked. In many cases you will want to enter the maximum number of branches to prevent the logging from becoming overwhelming. Warning: Enabling logging (beyond log level 0) consumes significant memory and slows the search, especially for logging level 2. If you set logging level 2, you should restrict it such as by setting the label or setting the maximum number of branches.
You can speed up searches by not allowing new disjoints, new statements‡, and/or new variables, but in some cases this may mean a proof won’t be found.
This dialogue can be used to implement functions similar to certain functions of the mmj2 tool:
- In mmj2 you can select a specific set of steps that must be used in a justification of a given statement‡. You can do something similar by doing a bottom-up proof of that given statement‡, and selecting just those statements‡ to be used as root statements‡ at the “first level”. This can be quite similar to mmj2 if you also uncheck “allow new statements‡”, which will prevent the introduction of new statements‡.
- In mmj2 you can state that a specific axiom or theorem must be used as the justification. You can do the same by selecting it as the “Label” in a bottom-up proof.
Unification
Metamath-lamp’s current unification algorithm is only unidirectional, that is, it can only substitute in one direction to find a match. In the technical literature this algorithm is often described as “matching” as compared to full syntactic unification. This is in contrast to other tools, like mmj2, which implement full syntactic unification.
There are some discussions about removing this limitation in metamath-lamp. There’s nothing fundamental to metamath-lamp about this limitation; the issue is that it takes time to write a performant implementation of unification. We hope that future versions of the tool will remove this limitation. However, current users must work around this limitation.
Settings tab
The “Settings” tab lets you configure metamath-lamp to your liking.
It’s important to remember that any changes you make in the Settings tab are not applied until you select “Apply Changes”; if you want to discard changes, select “Discard Changes”.
One setting in particular that you might want to change involves how to interpret left click. Should you edit statements with left click - and thus select statements using Alt + left click? Or the reverse? The choice is yours.
Most of the other settings should be fairly obvious, and in most cases you won’t want to change them.
Future directions
There are many ways the metamath-lamp tool could be expanded.
Proposals are listed in its
issues
and proposed changes are listed in its
pull requests.
You can follow
commits in its develop branch and even try out the
development version of metamath-lamp application page (but this may not work as expected).
In this section we’ll cover some potential future directions.
One small but important expected change is support for a “long click”. Holding down the left mouse button or touch for a longer time (e.g., 500 milliseconds) is a “long click”, and is considered the same as alt+left click. This small change means that smartphones will be able to access all of metamath-lamp’s functionality.
Another expected change is that the first created step will be specially marked as a “goal”. Goals will be treated somewhat differently from other steps, to make the default behavior more convenient.
A future version is likely to have an “explorer” tab to let you explore the contents of a database. Below is draft text describing this feature, which may give you glimpse.
Tutorial: A tour using the Explorer tab
The tab bar lets you switch between tabs, and those tabs always include “Settings”, “Editor”, and “Explorer”. The explorer tab lets us view the assertions (axioms and theorems) in the current loaded context. Let’s try out the Explorer tab.
Loading a context for the explorer
You need to have a context loaded before the explorer tab is useful.
For our purposes we’ll use the set.mm database.
If you’re continuing the tutorial, you’ve done that.
However, if you’re starting at this point, first load set.mm as the context:
Make sure we are loading from the web the file “set.mm:latest”, You can change the scope or not, your choice. Then press “Apply changes” to apply this change.
Trying out the explorer tab
Let’s try out the explorer tab:
Click on “Explorer” in the tab bar.
The explorer view lets you see the various assertions (axioms and theorems) in the loaded database(s). The top of the explorer view lets you select what to view; by default all assertions are included. There are typically many assertions, so this is a paged view.
After that begin the list of assertions (theorems and axioms). Each assertion shows its count, the type of assertion (theorem or axiom), and the assertion label in bold. The rest of the display shows a list of 0 or more hypotheses, each prefixed with large black circle “⬤”. The final line of an assertion states what can be concluded via this assertion when its hypotheses are true.
You can use the fragment selector to copy useful portions of any statement. Next to the name of each axiom or theorem is a “>” symbol which lets you expand or hide its description.
Let’s look at axiom ax-mp, which is probably assertion number 5
in your display. Axiom ax-mp is called modus ponens and is well-known.
Here is what it looks like in the explorer display:
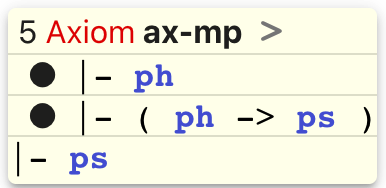
Modus ponens has two hypotheses:
|- ph- that is, “whenphis true”, and|- ( ph -> ps )- that is, “whenphimpliesps”
Using axiom ax-mp, whenever those two hypotheses are true, you
can prove “ps is true”. Note that ph and ps are variables over
any well-formed formula (wff) expression, that is, anything that
is true or false; it’s not limited to being replaced by just another variable.
The axiom modus ponens can apply to many circumstances.
If you select the label (aka name) of a theorem, a new tab will be created that shows details the proof of that theorem:
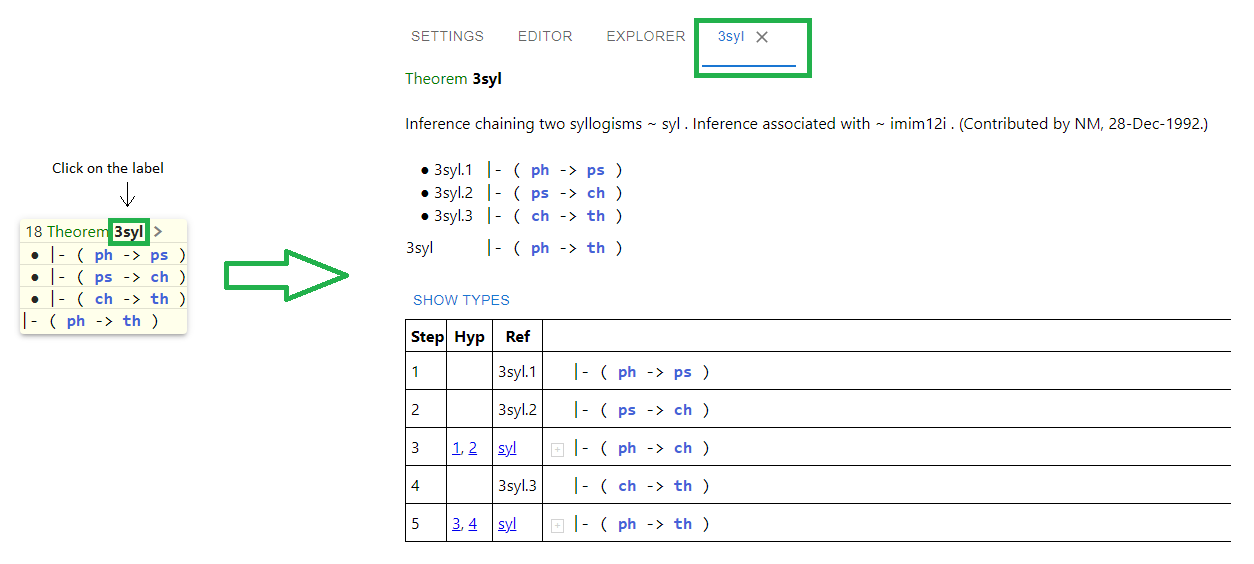
Let’s try that out next.
Viewing proof of mp2
In the explorer view, scroll down to theorem mp2, and click on the
name mp2. This will create a new tab that shows details about the
proof of mp2.
Many capabilities are available in a displayed proof.
Again, you can use the fragment selector to copy useful portions of any statement.
You can also “show types”, which shows the proof that a given expression has the given correct types. Metamath proofs include proofs of the types of each expression; you can decide whether or not to see this.
Clicking on a use of a hypothesis step label will move the display to that step.
At the beginning of the statement is a small “+” (reveal/hide), where you can reveal or hide a visualization of that step. Try that out; the visualizations can make it easier to understand how Metamath proofs work.
Clicking on a reference to an assertion will show an individual assertion tab of that assertion (creating the tab if necessary). That tab will provide detailed information about the assertion.
Gaining an understanding on set.mm’s beginnings
You can use the explorer to gain many insights into a database
(and mathematics in general).
In this section we’ll walk through the first few assertions
of set.mm to gain some understanding of it.
If you’re already familiar with set.mm, you can skip this section.
Let’s go back to the explorer tab:
Click on the “Explorer” text in the tab bar, and scroll to the top.
Let’s gain a brief understanding of the first theorems and axioms. We are entering the foundations of the foundations - the very basement - of the “typical” mathematics of classical logic and ZFC set theory.
The first theorem we have is a1ii.
It has two hypotheses and one conclusion, and
all the statements begin with |- meaning “this is true”.
Theorem a1ii can be interpreted as saying that if some ph is true,
and some ps is true, then that ph is true.
This simply lets us restate truths; this is only useful in
special technical situations, but it’s hard to argue with the conclusion.
Theorem idi is similar; it says that if some ph is true, then that
ph is true.
This also lets us restate truths; this is again only useful in
special technical situations, but it’s hard to argue with the conclusion.
This theorem was contributed by Alan Sare, which you can see by clicking
on the “>” next to the name. The names of people who formalized and
proposed various statements are included in their description.
Assertion 3 is our first axiom, but it’s not an assertion of truth (|-),
it’s an assertion that something is a well-formed formula (wff).
It says wff -. ph, that is, if some ph is a wff
(an expression that is true or false), then
-. ph is also a wff.
The sequence -. represents “logical not”, and this axiom
allows us to use the sequence -. ph as a wff where ph is a wff.
Assertion 4 is a similar axiom, stating that
( ph -> ps ) is a well-formed formula (wff).
Notice the parentheses; since they are specified as part of the axiom allowing
the use of ->, the parentheses are required when using ->.
Assertion 5 is axiom ax-mp, aka modus ponens.
If ph is true, and ph implies ps, then ps is true.
The next 3 axioms define the axioms of propositional logic, that is, the fundamental rules for determining if something is true or false given other values that are true or false. These are the same as, for example, those of Margaris.
Axiom ax-1 is also called “Simp” or the “principle of simplification”.
It asserts that |- ( ph -> ( ps -> ph ) ).
If you open the description you’ll see that this formalization was
contributed by “NM”. “NM” stands for Norman Megill, the original
creator of the Metamath system. As you can see, we try to give credit
to those who take the time to formalize mathematics; we hope you’ll
eventually create proofs and get credit too!
Axiom ax-2 is also called “Frege”.
It asserts that
|- ( ( ph -> ( ps -> ch ) ) -> ( ( ph -> ps ) -> ( ph -> ch ) ) )
This looks more complex than it is; it really just
“distributes” an antecedent over two consequents.
Axiom ax-3 is also called “Transp”.
It asserts that
|- ( ( -. ph -> -. ps ) -> ( ps -> ph ) ).
Theorem mp2 then proves a claim
(a double modus ponens) using only previously-accepted assertions.
There are many more theorems of course. We should briefly point out one,
syl. The theorem syl proves that if ( ph -> ps ) and
( ps -> ch ), then ( ph -> ch ). This is one of the most
commonly-used theorems in the entire set.mm database.
These are very basic beginnings. What’s extraordinary is that you can build up, assertion by assertion, to eventually completely prove complex mathematical ideas.
Reference Manual addition: Explorer tab
The explorer view lets you see the various assertions (axioms and theorems) in the loaded database(s).
The top of the explorer view lets you select what to view; by default all assertions are included. You can select the assertion type (axioms, theorems or all), text that must be included in the label, or a pattern that must be in the conclusion (see search patterns). The crossed-out funnel symbol erases all search criteria, once again showing all assertions.
There are typically many assertions, so this is a paged view. Click on “<” and “>” to see the previous and next page, the page number to see a page, or enter the page number.
After that begin the list of assertions (theorems and axioms). Each assertion shows its count, the type of assertion (theorem or axiom), and the assertion label in bold. The rest of the display shows a list of 0 or more hypotheses, each prefixed with large black circle “⬤”. The final line of an assertion states what can be concluded via this assertion when its hypotheses are true.
You can use the fragment selector to copy useful portions of any statement. Next to the name of each axiom or theorem is a “>” symbol which lets you expand or hide its description.
If you select the label of an assertion, you will be brought to an individual assertion tab specific to that assertion. This tab will be dynamically created if it doesn’t exist already.
Reference Manual addition: Individual Assertion tab
The tab bar shows all the opened dynamically-created individual assertions. You can click on the “x” after any dynamically-created tab to remove the tab.
Each individual assertion tab displays information about one assertion, including its description and proof.
Again, you can use the fragment selector to copy useful portions of any statement.
If it’s a theorem, you can select “show types”, which shows the proof that a given expression has the given correct types. If it’s an axiom, types are always shown (axioms are accepted as givens so there’s nothing else to prove). Metamath proofs include proofs of the types of each expression; you can decide whether or not to see this.
Clicking on a use of a hypothesis step label will show the individual assertion tab for that label (creating the tab if necessary).
At the beginning of the statement is a small “+” (reveal/hide), where you can reveal or hide a visualization of that step.
Clicking on a reference to an assertion will show an individual assertion tab of that assertion (creating the tab if necessary). That tab will provide detailed information about the assertion.
Help, feedback, and contributions
Metamath-lamp is intended to be an easy-to-use proof assistant. We hope you’ll find that it meets your needs.
No matter how you decide to contribute, we thank you for your time.
Creating and contributing proofs
As noted earlier, if you want to run the metamath-lamp application to create proofs, view the Metamath-lamp application page.
If you need help on how to create Metamath proofs, or on how to use the metamath-lamp tool to create Metamath proofs, the best place to go is the Metamath mailing list. You can find a lot of general information about Metamath at the Metamath home page.
If you’re making a contribution to a Metamath database, such as a new
proof, please contribute those as changes to the database’s repository.
For example, for set.mm, propose changes to the
set.mm database source repository.
If it’s your first time, you should contact the mailing list; they
would be delighted to help you complete that process.
Feedback on this guide (not the metamath-lamp tool)
If you have feedback (issues) or contributions (pull requests) for this guide, please do that by filing issues and pull requests on the Metamath-lamp guide source markdown repository. Do not send proposals about the tool to this repo, as it is only for proposed changes to this guide document.
Feedback on the metamath-lamp tool (not the guide)
For feedback or proposed changes to the Metamath-lamp tool itself, please file issues or create pull requests against the metamath-lamp source code repository. Do not send proposals about the guide to this repo, as it is only for proposed changes to the tool itself
If you want to be on the bleeding edge, you can use the development version of Metamath-lamp application page (but this may not work as expected).
Quick tour of the metamath-lamp source code
If you wish to try to contribute code to the metamath-lamp project itself, you’ll need to learn more. Here are some hints.
The metamath-lamp program is written in the
ReScript programming language.
ReScript is a robustly typed language that
compiles to efficient and human-readable JavaScript.
ReScript is a programming language
similar to OCaml;
it is multi-paradigm but it encourages functional programming approaches.
ReScript source files have the extension .res (for most code) or
.resi (for external interfaces).
For more about ReScript, see this
introduction
and
overview.
ReScript has a sound type system and its code has no null/undefined errors.
By default you must specify the full scoped name of a function, e.g.,
mytext->Js_string2.split(":").
Metamath-lamp uses the widely-used React library to implement its user interface. The Rescript programming languages comes with a robust API to use React and JavaScript.
In discussions, metamath-lamp is often abbreviated as mm-lamp.
To simplify things and not have to think about different possible scenarios, metamath-lamp tends to use the approach stop if bad data is detected and let the user decide how to correct the data.
Here are some conventions for the source code filenames:
- Filenames beginning with
MM_cmp_*.res(meaning “component”) are very coupled with UI related things, e.g., React, the web browser DOM, window global variables, and so on. Usually one cmp file contains one React component, but this is not a strict rule and there are a few exceptions. - Filenames beginning with
MM_wrk_*.res(meaning “worker”) must not depend on UI related things, as these files could be (eventually) used in a worker thread. Worker threads don’t support many features which are supported in the main thread. If such a UI related feature appears in a worker thread it usually leads to an error (compilation or runtime). Where possible, put functionality inMM_wrk_files instead ofMM_cmp_files; this means they can work in worker file and makes them much easier to test.
Here are some conventions for the source code itself:
- Where at all possible, please reuse existing functions unless there’s a strong reason to do otherwise, as this simplifies code review. It’s acknowledged that this is challenge when you are new to the code base.
- Functional style is generally used, e.g.,
filterandmap. - Like several other languages, many functions return an
Option(which can beSome('a)orNone) or aResult(which can beOk('good)orError('bad)). These enable compile-time checking that prevent null and undefined errors. By convention prefer using these for returning error information. ReScript also supports exceptions, but you should generally avoid using exceptions for control flow unless they’re needed. - Names normally use camelCase. Most names (including variable and function names) use lowerCamelCase, but module names use UpperCamelCase.
- ReScript has two built-in libraries:
Jsfor simple interfaces direct to JavaScript, andBeltwhich provides more sophisticated collection handling. When either works, prefer theJsinterfaces which are simpler and map directly to JavaScript, but do use Belt when it helps. - Use the
->(pipe) construct as is now conventional in ReScript. The->is syntactic sugar that allows you to call a function but with the parameter to the left of->becoming the first (or specified) parameter of the function. For example, function callmyData->MyModule.myFunctionmeans the same thing asMyModule.myFunction(myData), and function callmyData->MyModule.myFunction(fooData)means the same thing asMyModule.myfunction(myData, fooData). See ReScript pipe for more information. This implies preferring the newer “data-first” ReScript interfaces, for example, you should preferArray2overArray. - If you add/modify functionality, please add/modify tests.
The source code for tests is in
*_test.resfiles. RSpec-style tests are created usingdescribe({... it({... )} ..}).
Licensing
You may use, modify, and share this guide under the terms of either the MIT license or the Creative Commons Attribution 4.0 International (CC-BY-4.0) license, at your choice.
In short, the license of this guide can be expressed using this SPDX license expression:
SPDX-License-Identifier: (MIT OR CC-BY-4.0)
We welcome contributions! Contributions back to this guide must be contributed under the same terms.
Metamath-lamp is licensed separately (it is released under the MIT license).
Detailed table of contents
Here is the detailed table of contents (ToC). We put this ToC near the end of the document so that readers using small screens won’t need to scroll through it just to see the early content.
- Quick start
- Sample Screenshot
- User guide (tutorial)
- Proof: 2 + 2 = 4
- Selecting the proof context for
2p2e4 - Setting the goal for
2p2e4 - Interlude: Brief review of metamath-lamp user interface
- Deciding on a proof strategy for
2p2e4 - Expanding the meaning of 4
- Expanding the meaning of ( 2 + 2 )
- Showing these expansions are equal
- Getting the completed proof
- Exporting and importing your current state
- Looking at proof steps
- Reordering steps
- Selecting the proof context for
- Proof: The reciprocal of the cotangent is tangent (
reccot)- Selecting the proof context for
reccot - Setting the goal for reccot
- Deciding on a proof strategy for
reccot - Beginning to expand the definition of tangent
- Interlude: Work variables
- Completing the work to expand the definition of tangent
- Expanding the definition of cotangent
- What does reciprocal do?
- Matching the goal’s antecedent for tangent
- Matching the goal’s antecedent for cotangent
- Handling the reciprocal of the cotangent
- Proving the preconditions we need
- Selecting the proof context for
- Proof: Principle of the syllogism (
syl) - Creating your own examples from existing proofs
- Loading existing metamath-lamp proofs
- Notes about Metamath databases
- Conclusion of this user guide
- Proof: 2 + 2 = 4
- Reference manual
- Future directions
- Help, feedback, and contributions
- Licensing
- Detailed table of contents
- Authors and Reviewers
Authors and Reviewers
This guide was written by David A. Wheeler (@david-a-wheeler) and reviewed by Igor Ieskov (@expln).